PyTorch within MLflow
PyTorch has emerged as one of the leading deep learning frameworks, renowned for its intuitive design, dynamic computation graphs, and seamless debugging capabilities. By combining PyTorch's flexibility with MLflow's experiment tracking, you gain a powerful workflow for developing, monitoring, and deploying machine learning models.
Why PyTorch is a Researcher's Favorite
Dynamic Computation Design
- 🔄 Dynamic Computation Graphs: Build and modify neural networks on-the-fly
- 🐞 Intuitive Debugging: Step through code execution like normal Python code
- 🔬 Research-First Philosophy: Designed with experimentation and rapid prototyping in mind
- 🧩 Pythonic Interface: Feels natural and familiar to Python developers
Powerful Ecosystem
- 🛠️ Rich Library Support: From computer vision (torchvision) to NLP (transformers)
- 🚀 Optimized Performance: C++ backend with CUDA support for GPU acceleration
- 👥 Vibrant Community: Extensive documentation, tutorials, and pre-trained models
- 🏢 Industry Adoption: Widely used in both academic research and production environments
Why MLflow + PyTorch?
The integration of MLflow with PyTorch creates a streamlined workflow for deep learning practitioners:
- 📊 Comprehensive Tracking: Capture parameters, metrics, model architecture, and artifacts in one place
- 🔄 Reproducible Experiments: Every training run is fully documented and can be reproduced exactly
- 📈 Visual Performance Analysis: Compare model performance across different architectures and hyperparameters
- 🏗️ Model Versioning: Track model lineage and evolution throughout the development lifecycle
- 👥 Collaborative Development: Share experiments and results with team members through MLflow's intuitive UI
- 🚀 Simplified Deployment: Package models for easy deployment across various production environments
Logging PyTorch Experiments to MLflow
Understanding PyTorch Autologging Limitations
Unlike other deep learning frameworks, MLflow doesn't provide automatic logging for vanilla PyTorch because of its custom training loop paradigm.
Alternative: PyTorch Lightning Autologging
If you want to use autologging with PyTorch, Lightning provides a structured framework that works seamlessly with MLflow's autologging capabilities:
import mlflow
import pytorch_lightning as pl

# Enable autologging with Lightning
mlflow.pytorch.autolog()

# Define your Lightning module and train as usual
trainer = pl.Trainer(max_epochs=10)
trainer.fit(model, train_dataloader, val_dataloader)
With Lightning + MLflow, you get:
- 🔄 Automatic Metric Logging: Training/validation metrics captured at each epoch
- ⚙️ Hyperparameter Tracking: Model parameters and training configuration logged automatically
- 📦 Model Checkpointing: Best models saved and logged to MLflow
- 📊 TensorBoard Integration: TensorBoard logs accessible through MLflow
For more details on Lightning integration, refer to the MLflow Lightning Developer Guide.
Manually Logging PyTorch Experiments
For standard PyTorch workflows, you can easily integrate MLflow logging into your training loops using these key APIs:
mlflow.log_metric()/mlflow.log_metrics(): Log metrics like accuracy and loss during trainingmlflow.log_param()/mlflow.log_params(): Log parameters like learning rate and batch sizemlflow.pytorch.log_model(): Save your PyTorch model to MLflowmlflow.log_artifact(): Log artifacts like model checkpoints and visualizations
Best Practices for PyTorch Logging
Initialization Phase
- 📋 Log Configuration Parameters: Use
mlflow.log_params()at the beginning of training to record learning rate, batch size, optimizer configuration, etc. - 🏗️ Log Model Architecture: Use
torchinfoto generate a model summary and log it viamlflow.log_artifact() - ⚙️ Log Dependencies: Record PyTorch version and key packages to ensure reproducibility
Training Phase
- 📊 Batch vs. Epoch Logging: For long epochs, log key metrics every N batches; otherwise, log per epoch
- 📈 Use Batched Logging: Prefer
mlflow.log_metrics()over multiplemlflow.log_metric()calls for better performance - 🔄 Track Training Dynamics: Log not just final metrics but their evolution throughout training
Finalization Phase
- 💾 Save Final Model: Use
mlflow.pytorch.log_model()to save the trained model - 📊 Log Performance Visualizations: Create and save plots of training curves, confusion matrices, etc.
- 📝 Add Model Signature: Include input/output signatures for better model understanding
Complete PyTorch Logging Example
Here's an end-to-end example of tracking a PyTorch experiment with MLflow:
import mlflow
import torch
import torch.nn as nn
import torch.optim as optim
from torch.utils.data import DataLoader
from torchvision import datasets, transforms
from torchinfo import summary

# Define device
device = torch.device("cuda" if torch.cuda.is_available() else "cpu")

# Load and prepare data
transform = transforms.Compose(
    [transforms.ToTensor(), transforms.Normalize((0.1307,), (0.3081,))]
)
train_dataset = datasets.FashionMNIST(
    "data", train=True, download=True, transform=transform
)
test_dataset = datasets.FashionMNIST("data", train=False, transform=transform)
train_loader = DataLoader(train_dataset, batch_size=64, shuffle=True)
test_loader = DataLoader(test_dataset, batch_size=1000)


# Define the model
class NeuralNetwork(nn.Module):
    def __init__(self):
        super().__init__()
        self.flatten = nn.Flatten()
        self.linear_relu_stack = nn.Sequential(
            nn.Linear(28 * 28, 512),
            nn.ReLU(),
            nn.Linear(512, 512),
            nn.ReLU(),
            nn.Linear(512, 10),
        )

    def forward(self, x):
        x = self.flatten(x)
        logits = self.linear_relu_stack(x)
        return logits


# Training parameters
params = {
    "epochs": 3,
    "learning_rate": 1e-3,
    "batch_size": 64,
    "optimizer": "SGD",
    "model_type": "MLP",
    "hidden_units": [512, 512],
}

# Training and logging
with mlflow.start_run():
    # 1. Log parameters
    mlflow.log_params(params)

    # 2. Create and prepare model
    model = NeuralNetwork().to(device)
    loss_fn = nn.CrossEntropyLoss()
    optimizer = optim.SGD(model.parameters(), lr=params["learning_rate"])

    # 3. Log model architecture
    with open("model_summary.txt", "w") as f:
        f.write(str(summary(model, input_size=(1, 1, 28, 28))))
    mlflow.log_artifact("model_summary.txt")

    # 4. Training loop with metric logging
    for epoch in range(params["epochs"]):
        model.train()
        train_loss = 0
        correct = 0
        total = 0

        for batch_idx, (data, target) in enumerate(train_loader):
            data = data.to(device)
            target = target.to(device)

            # Forward pass
            optimizer.zero_grad()
            output = model(data)
            loss = loss_fn(output, target)

            # Backward pass
            loss.backward()
            optimizer.step()

            # Calculate metrics
            train_loss += loss.item()
            _, predicted = output.max(1)
            total += target.size(0)
            correct += predicted.eq(target).sum().item()

            # Log batch metrics (every 100 batches)
            if batch_idx % 100 == 0:
                batch_loss = train_loss / (batch_idx + 1)
                batch_acc = 100.0 * correct / total
                mlflow.log_metrics(
                    {"batch_loss": batch_loss, "batch_accuracy": batch_acc},
                    step=epoch * len(train_loader) + batch_idx,
                )

        # Calculate epoch metrics
        epoch_loss = train_loss / len(train_loader)
        epoch_acc = 100.0 * correct / total

        # Validation
        model.eval()
        val_loss = 0
        val_correct = 0
        val_total = 0

        with torch.no_grad():
            for data, target in test_loader:
                data = data.to(device)
                target = target.to(device)
                output = model(data)
                loss = loss_fn(output, target)

                val_loss += loss.item()
                _, predicted = output.max(1)
                val_total += target.size(0)
                val_correct += predicted.eq(target).sum().item()

        # Calculate and log epoch validation metrics
        val_loss = val_loss / len(test_loader)
        val_acc = 100.0 * val_correct / val_total

        # Log epoch metrics
        mlflow.log_metrics(
            {
                "train_loss": epoch_loss,
                "train_accuracy": epoch_acc,
                "val_loss": val_loss,
                "val_accuracy": val_acc,
            },
            step=epoch,
        )

        print(
            f"Epoch {epoch+1}/{params['epochs']}, "
            f"Train Loss: {epoch_loss:.4f}, Train Acc: {epoch_acc:.2f}%, "
            f"Val Loss: {val_loss:.4f}, Val Acc: {val_acc:.2f}%"
        )

    # 5. Log the trained model
    model_info = mlflow.pytorch.log_model(model, name="model")

    # 6. Final evaluation
    model.eval()
    test_loss = 0
    test_correct = 0
    test_total = 0

    with torch.no_grad():
        for data, target in test_loader:
            data = data.to(device)
            target = target.to(device)
            output = model(data)
            loss = loss_fn(output, target)

            test_loss += loss.item()
            _, predicted = output.max(1)
            test_total += target.size(0)
            test_correct += predicted.eq(target).sum().item()

    # Calculate and log final test metrics
    test_loss = test_loss / len(test_loader)
    test_acc = 100.0 * test_correct / test_total

    mlflow.log_metrics({"test_loss": test_loss, "test_accuracy": test_acc})

    print(f"Final Test Accuracy: {test_acc:.2f}%")
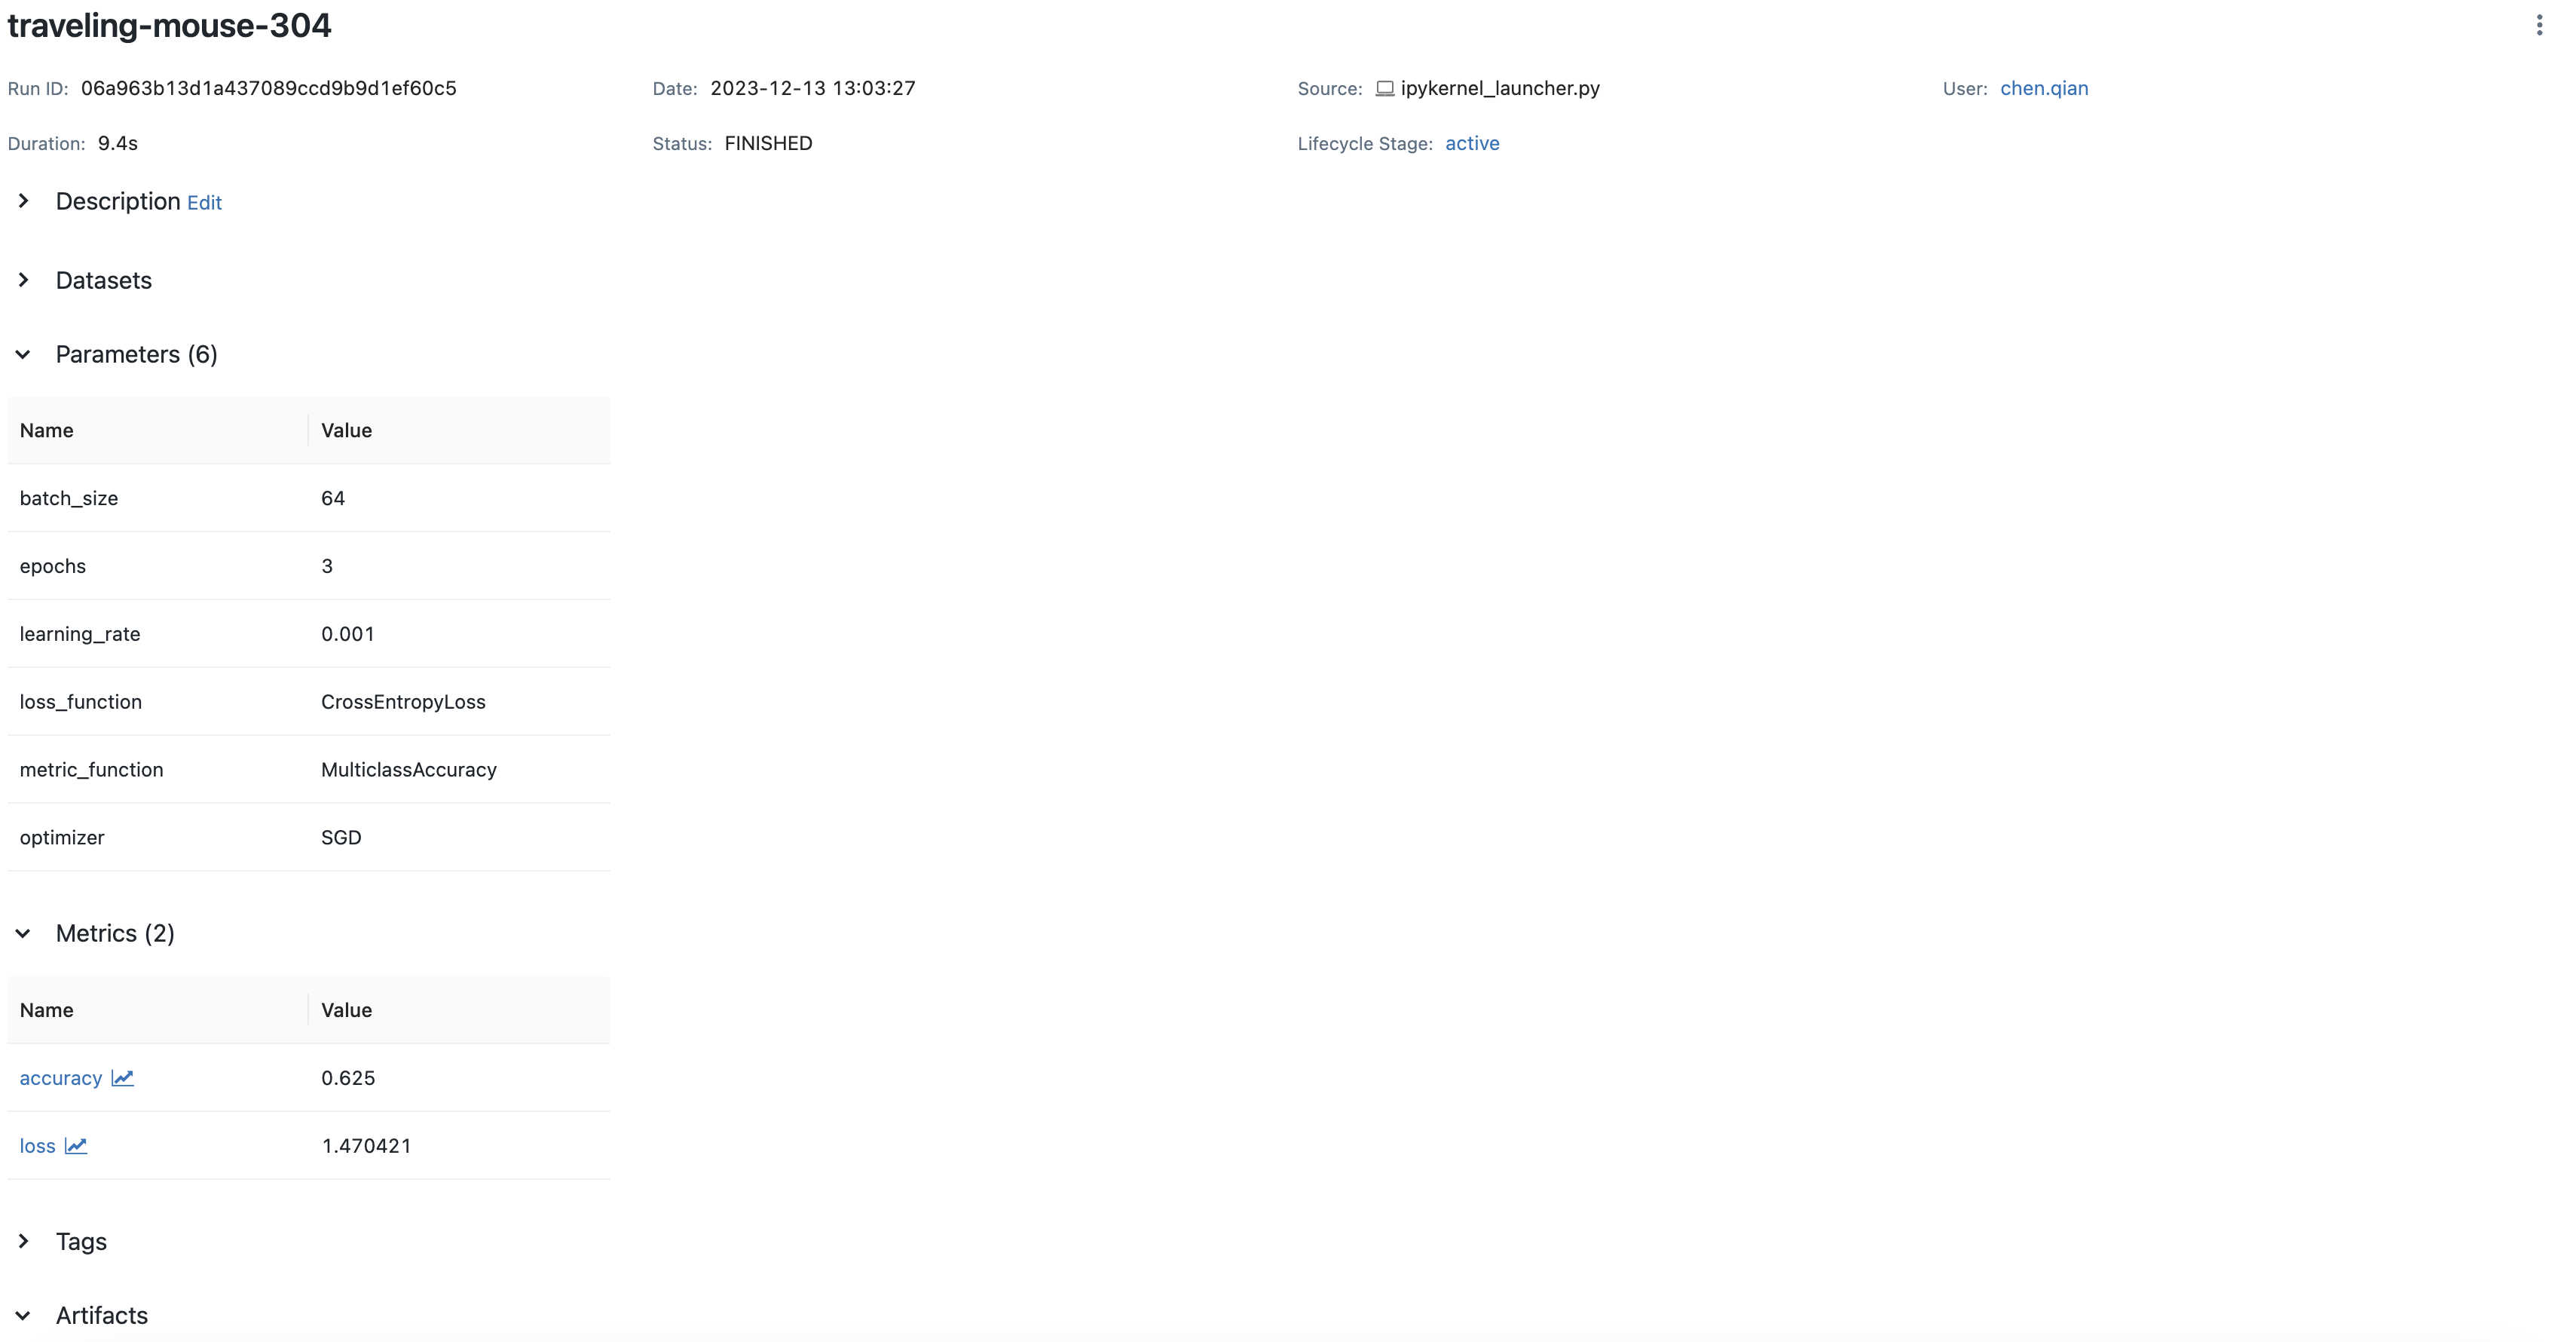
If you run this code with a local MLflow server, you'll see comprehensive tracking in the MLflow UI:
Saving Your PyTorch Model to MLflow
Basic Model Saving
MLflow makes it easy to save and load PyTorch models for reproducible inference:
import mlflow
import numpy as np
import torch
import torch.nn as nn


# Define model
class NeuralNetwork(nn.Module):
    def __init__(self):
        super().__init__()
        self.flatten = nn.Flatten()
        self.linear_relu_stack = nn.Sequential(
            nn.Linear(28 * 28, 512),
            nn.ReLU(),
            nn.Linear(512, 512),
            nn.ReLU(),
            nn.Linear(512, 10),
        )

    def forward(self, x):
        x = self.flatten(x)
        logits = self.linear_relu_stack(x)
        return logits


model = NeuralNetwork()

# Train your model (code omitted for brevity)

model_info = mlflow.pytorch.log_model(model, name="model")

# Load and use the model
loaded_model = mlflow.pyfunc.load_model(model_info.model_uri)

# Make predictions
sample_input = np.random.uniform(size=[1, 28, 28]).astype(np.float32)
predictions = loaded_model.predict(sample_input)
print("Predictions:", predictions)
TorchScript Compatibility
MLflow seamlessly works with TorchScript, which can optimize your models for production:
# Create a scripted version of your model
scripted_model = torch.jit.script(model)

# Log the scripted model to MLflow
model_info = mlflow.pytorch.log_model(scripted_model, name="scripted_model")

# The logged model will contain the compiled graph
Benefits of using TorchScript with MLflow:
- ⚡ Performance Optimization: Compiled graphs for faster inference
- 🔒 Deployment Security: Protected model architecture for secure deployment
- 🌉 Language Interoperability: Use models in C++ environments
- 📱 Mobile Deployment: Optimized for resource-constrained devices
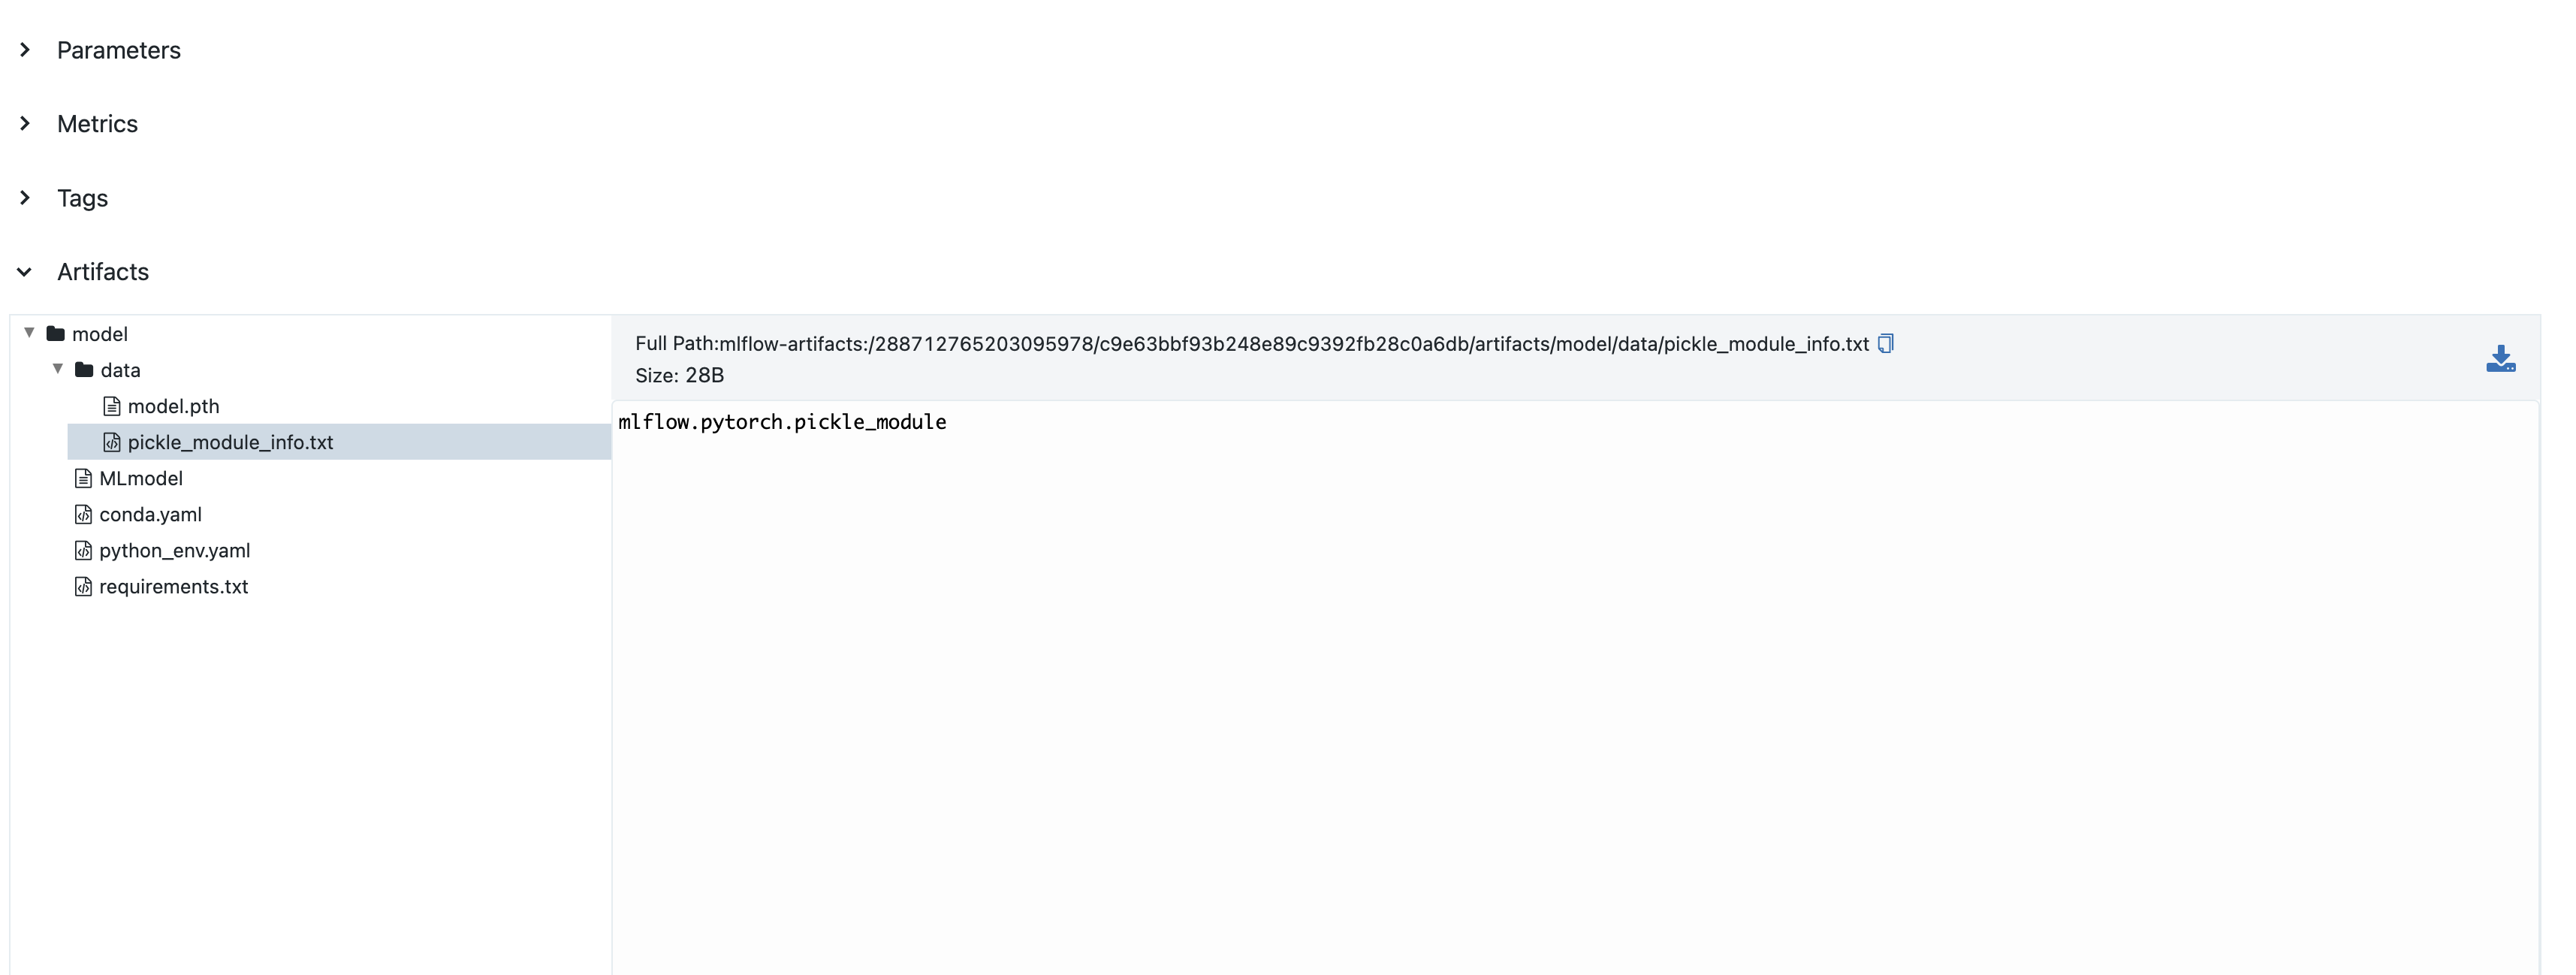
You can view the saved model in the MLflow UI:
Model Signatures
A model signature defines the schema of inputs and outputs, enhancing model understanding and enabling validation. The simplest way to add a signature is using automatic inference:
import mlflow
from mlflow.models import infer_signature
import numpy as np
import torch

# Create sample input and predictions
sample_input = np.random.uniform(size=[1, 28, 28]).astype(np.float32)

# Get model output - convert tensor to numpy
with torch.no_grad():
    output = model(torch.tensor(sample_input))
    sample_output = output.numpy()

# Infer signature automatically
signature = infer_signature(sample_input, sample_output)

# Log model with signature
model_info = mlflow.pytorch.log_model(model, name="model", signature=signature)
As of MLflow 2.9.1, input and output to mlflow.models.infer_signature() must be numpy.ndarray, not torch.Tensor. Always convert tensors to numpy arrays first.
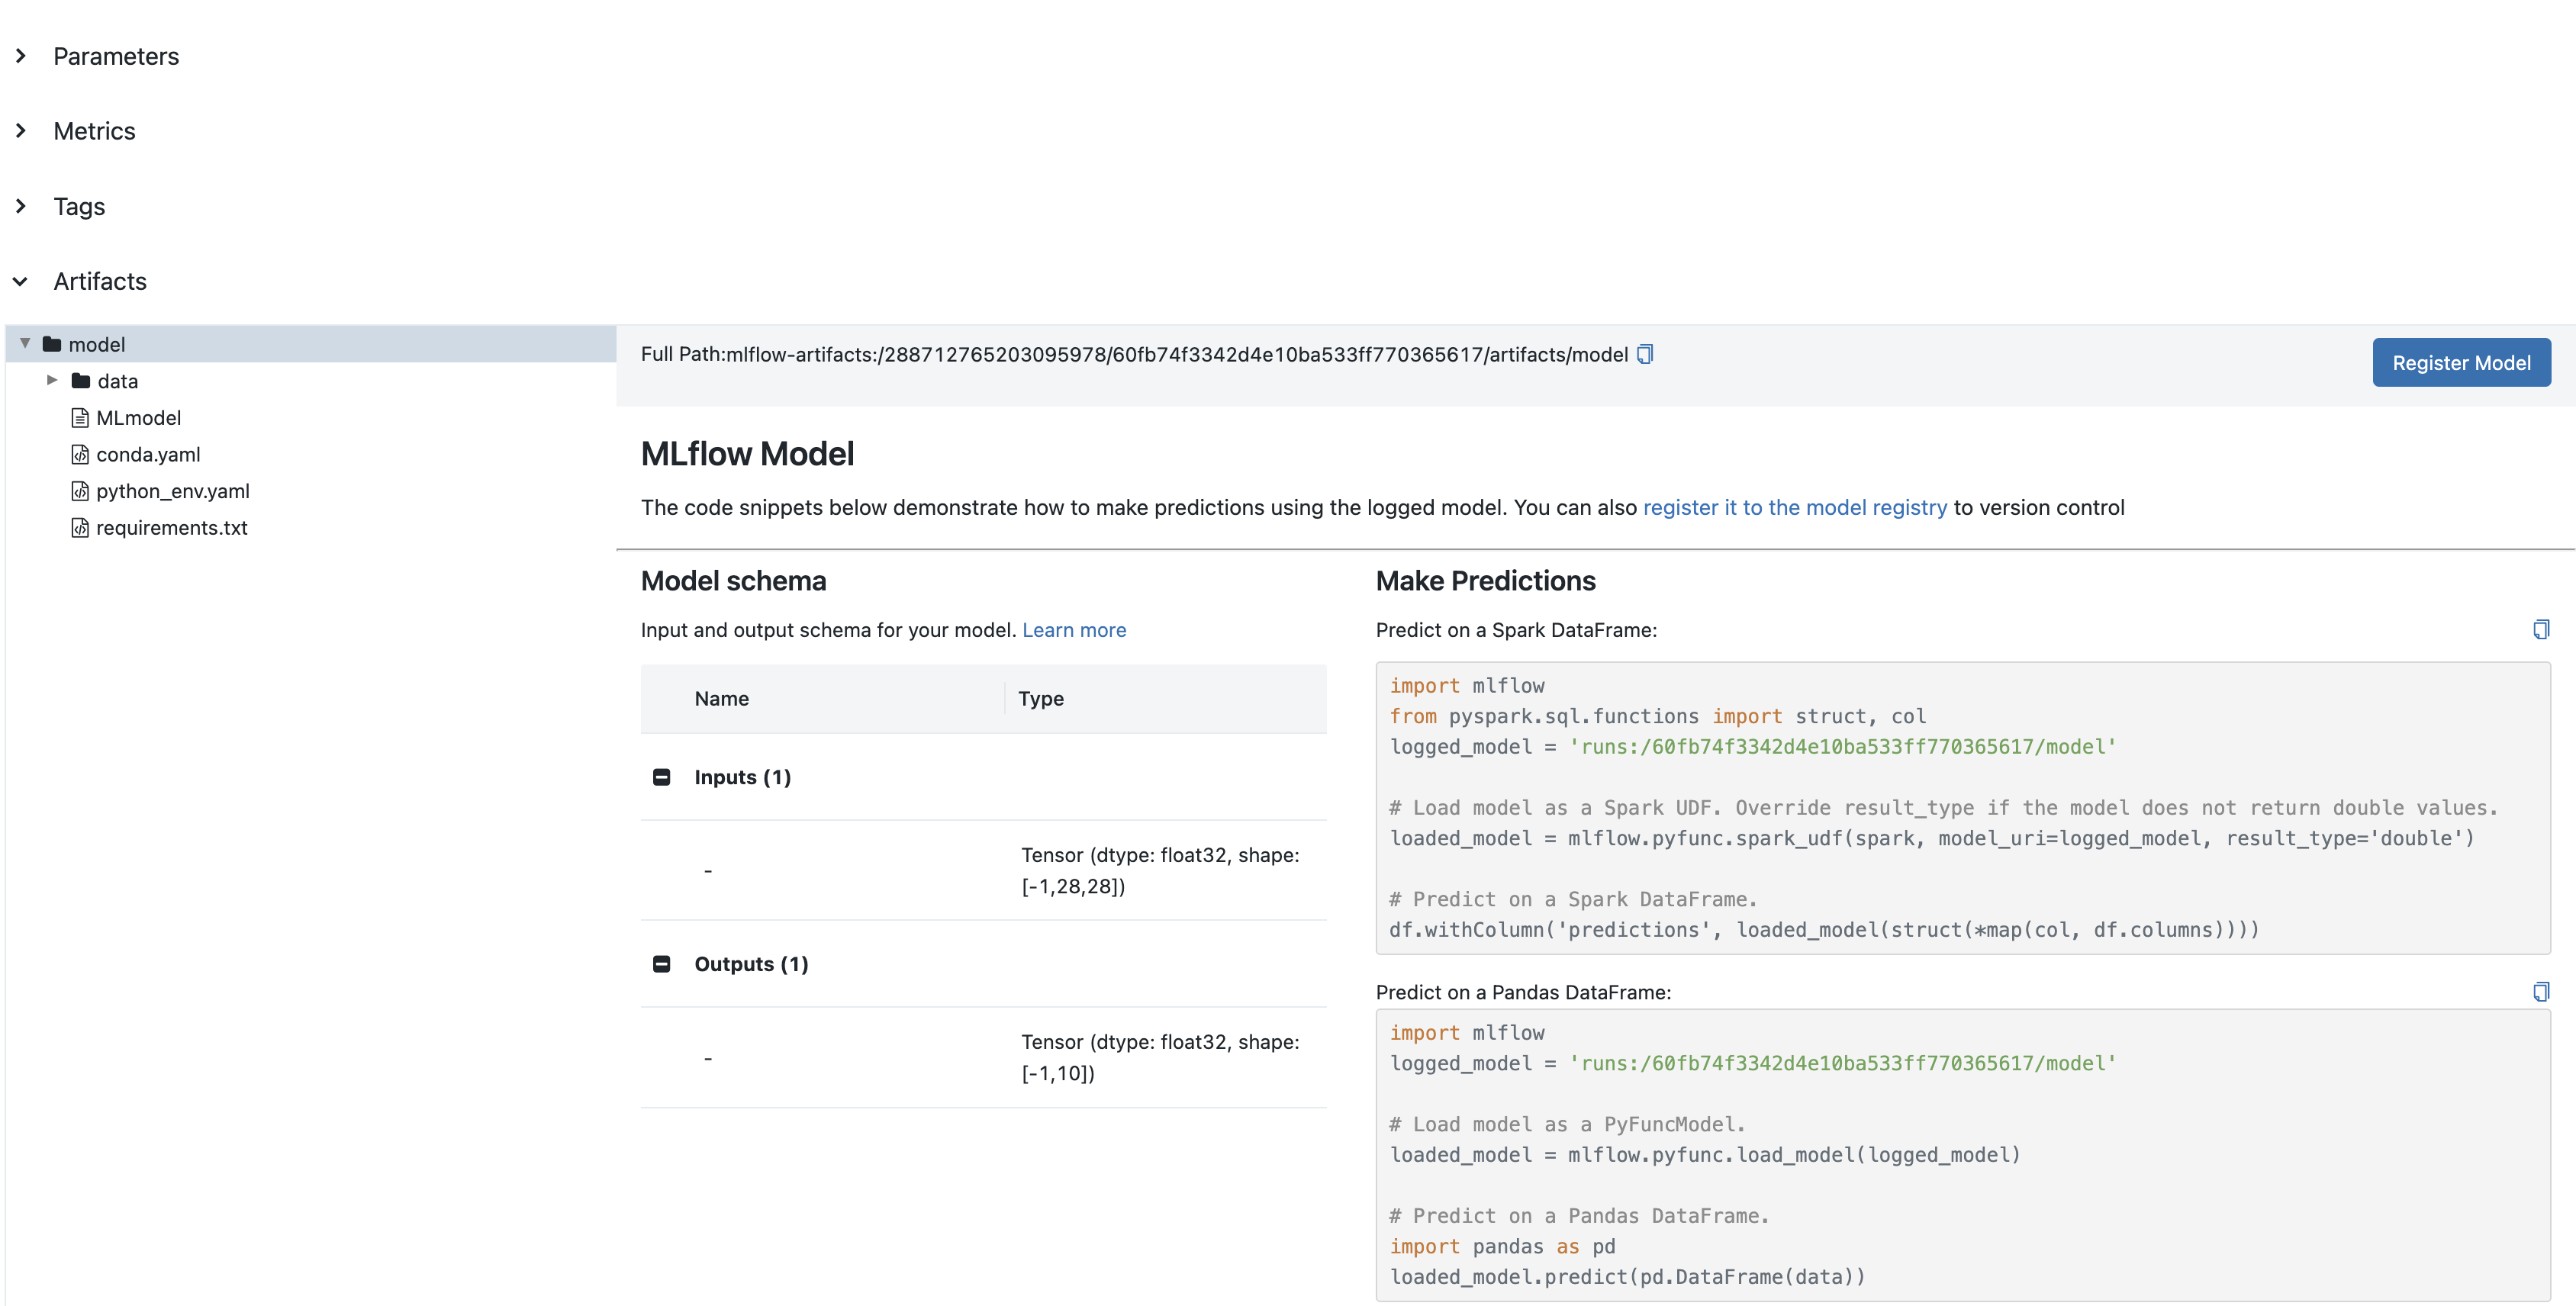
The signature will appear in the MLflow UI:
Manual Signature Definition
For complete control over your model signature, you can manually define the input and output schemas:
import mlflow
import numpy as np
from mlflow.types import Schema, TensorSpec
from mlflow.models import ModelSignature

# Manually define input and output schemas
input_schema = Schema([TensorSpec(np.dtype(np.float32), (-1, 28, 28))])
output_schema = Schema([TensorSpec(np.dtype(np.float32), (-1, 10))])
signature = ModelSignature(inputs=input_schema, outputs=output_schema)

# Log model with signature
model_info = mlflow.pytorch.log_model(model, name="model", signature=signature)
Manual definition is useful when:
- You need precise control over tensor specifications
- Working with complex input/output structures
- The automatic inference doesn't capture your intended schema
- You want to specify exact data types and shapes upfront
Advanced PyTorch Tracking
Custom Training Loop with Detailed Metrics
For more sophisticated tracking, you can implement custom callbacks and visualizations:
Comprehensive Tracking with Visualizations
import mlflow
import torch
import matplotlib.pyplot as plt
import seaborn as sns
import numpy as np
from sklearn.metrics import confusion_matrix


class MLflowTracker:
    def __init__(self, model, classes):
        self.model = model
        self.classes = classes
        self.train_losses = []
        self.val_losses = []
        self.train_accs = []
        self.val_accs = []

    def log_epoch(self, epoch, train_loss, train_acc, val_loss, val_acc):
        """Log metrics for an epoch."""
        self.train_losses.append(train_loss)
        self.val_losses.append(val_loss)
        self.train_accs.append(train_acc)
        self.val_accs.append(val_acc)

        mlflow.log_metrics(
            {
                "train_loss": train_loss,
                "train_accuracy": train_acc,
                "val_loss": val_loss,
                "val_accuracy": val_acc,
            },
            step=epoch,
        )

    def log_confusion_matrix(self, val_loader, device):
        """Generate and log confusion matrix."""
        self.model.eval()
        all_preds = []
        all_targets = []

        with torch.no_grad():
            for inputs, targets in val_loader:
                inputs = inputs.to(device)
                targets = targets.to(device)
                outputs = self.model(inputs)
                _, preds = torch.max(outputs, 1)

                all_preds.extend(preds.cpu().numpy())
                all_targets.extend(targets.cpu().numpy())

        # Create confusion matrix
        cm = confusion_matrix(all_targets, all_preds)

        # Plot
        plt.figure(figsize=(10, 8))
        sns.heatmap(
            cm,
            annot=True,
            fmt="d",
            cmap="Blues",
            xticklabels=self.classes,
            yticklabels=self.classes,
        )
        plt.title("Confusion Matrix")
        plt.ylabel("True Label")
        plt.xlabel("Predicted Label")
        plt.tight_layout()

        # Save and log
        plt.savefig("confusion_matrix.png")
        mlflow.log_artifact("confusion_matrix.png")
        plt.close()

    def log_training_curves(self):
        """Generate and log training curves."""
        plt.figure(figsize=(12, 5))

        # Loss subplot
        plt.subplot(1, 2, 1)
        plt.plot(self.train_losses, label="Train Loss")
        plt.plot(self.val_losses, label="Validation Loss")
        plt.title("Loss Curves")
        plt.xlabel("Epoch")
        plt.ylabel("Loss")
        plt.legend()

        # Accuracy subplot
        plt.subplot(1, 2, 2)
        plt.plot(self.train_accs, label="Train Accuracy")
        plt.plot(self.val_accs, label="Validation Accuracy")
        plt.title("Accuracy Curves")
        plt.xlabel("Epoch")
        plt.ylabel("Accuracy (%)")
        plt.legend()

        plt.tight_layout()
        plt.savefig("training_curves.png")
        mlflow.log_artifact("training_curves.png")
        plt.close()
Usage in training loop:
# Initialize tracker
tracker = MLflowTracker(
    model,
    classes=[
        "T-shirt",
        "Trouser",
        "Pullover",
        "Dress",
        "Coat",
        "Sandal",
        "Shirt",
        "Sneaker",
        "Bag",
        "Ankle boot",
    ],
)

with mlflow.start_run():
    mlflow.log_params(params)

    for epoch in range(params["epochs"]):
        # Training code...

        # Log epoch metrics
        tracker.log_epoch(epoch, train_loss, train_acc, val_loss, val_acc)

    # Log final visualizations
    tracker.log_confusion_matrix(test_loader, device)
    tracker.log_training_curves()

    # Log model
    model_info = mlflow.pytorch.log_model(model, name="model")
Hyperparameter Optimization
Combine PyTorch with hyperparameter optimization tools while tracking everything in MLflow:
import mlflow
import optuna
from functools import partial


def objective(trial, train_loader, val_loader, device):
    # Suggest hyperparameters
    lr = trial.suggest_float("lr", 1e-5, 1e-1, log=True)
    optimizer_name = trial.suggest_categorical("optimizer", ["Adam", "SGD"])
    hidden_size = trial.suggest_categorical("hidden_size", [128, 256, 512])

    with mlflow.start_run(nested=True):
        # Log hyperparameters
        params = {
            "lr": lr,
            "optimizer": optimizer_name,
            "hidden_size": hidden_size,
            "batch_size": 64,
            "epochs": 3,
        }
        mlflow.log_params(params)

        # Create model
        model = NeuralNetwork(hidden_size=hidden_size).to(device)
        loss_fn = nn.CrossEntropyLoss()

        # Configure optimizer
        if optimizer_name == "Adam":
            optimizer = optim.Adam(model.parameters(), lr=lr)
        else:
            optimizer = optim.SGD(model.parameters(), lr=lr)

        # Train for a few epochs
        best_val_acc = 0
        for epoch in range(params["epochs"]):
            # Training code (abbreviated)...
            train_loss, train_acc = train_epoch(
                model, train_loader, loss_fn, optimizer, device
            )
            val_loss, val_acc = evaluate(model, val_loader, loss_fn, device)

            mlflow.log_metrics(
                {
                    "train_loss": train_loss,
                    "train_acc": train_acc,
                    "val_loss": val_loss,
                    "val_acc": val_acc,
                },
                step=epoch,
            )

            best_val_acc = max(best_val_acc, val_acc)

        # Final logging
        mlflow.log_metric("best_val_acc", best_val_acc)
        mlflow.pytorch.log_model(model, name="model")

        return best_val_acc


# Execute hyperparameter search
with mlflow.start_run(run_name="hyperparam_optimization"):
    study = optuna.create_study(direction="maximize")
    objective_func = partial(
        objective, train_loader=train_loader, val_loader=val_loader, device=device
    )
    study.optimize(objective_func, n_trials=20)

    # Log best parameters and score
    mlflow.log_params(study.best_params)
    mlflow.log_metric("best_val_accuracy", study.best_value)
Real-World Applications
The MLflow-PyTorch integration excels in scenarios such as:
- 🖼️ Computer Vision: Track CNN architectures, data augmentation strategies, and performance for image classification, object detection, and segmentation
- 📝 Natural Language Processing: Monitor transformer models, embeddings, and generation quality for language understanding and text generation
- 🔊 Audio Processing: Log spectrograms, model performance, and audio samples for speech recognition and music generation
- 🎮 Reinforcement Learning: Track agent performance, reward optimization, and environment interactions
- 🧬 Scientific Research: Monitor model convergence and validation metrics for complex scientific applications
- 🏭 Industrial Applications: Version models from development to deployment with full lineage tracking
Conclusion
The MLflow-PyTorch integration provides a comprehensive solution for tracking, managing, and deploying deep learning experiments. By combining PyTorch's flexibility with MLflow's experiment tracking capabilities, you create a workflow that is:
- 🔍 Transparent: Every aspect of training is visible and trackable
- 🔄 Reproducible: Experiments can be recreated exactly
- 📊 Comparable: Different approaches can be evaluated side-by-side
- 📈 Scalable: From simple prototypes to complex production models
- 👥 Collaborative: Team members can share and build upon each other's work
Whether you're a researcher exploring new architectures or an engineer deploying models to production, the MLflow-PyTorch integration provides the foundation for organized, reproducible, and scalable deep learning development.