MLflow Models
An MLflow Model is a standard format for packaging machine learning models that can be used in a variety of downstream tools---for example, real-time serving through a REST API or batch inference on Apache Spark. The format defines a convention that lets you save a model in different "flavors" that can be understood by different downstream tools.
Storage Format
Each MLflow Model is a directory containing arbitrary files, together with an MLmodel
file in the root of the directory that can define multiple flavors that the model can be viewed
in.
The model aspect of the MLflow Model can either be a serialized object (e.g., a pickled scikit-learn model)
or a Python script (or notebook, if running in Databricks) that contains the model instance that has been defined
with the mlflow.models.set_model() API.
Flavors are the key concept that makes MLflow Models powerful: they are a convention that deployment
tools can use to understand the model, which makes it possible to write tools that work with models
from any ML library without having to integrate each tool with each library. MLflow defines
several "standard" flavors that all of its built-in deployment tools support, such as a "Python
function" flavor that describes how to run the model as a Python function. However, libraries can
also define and use other flavors. For example, MLflow's mlflow.sklearn
library allows loading models back as a scikit-learn Pipeline object for use in code that is aware of
scikit-learn, or as a generic Python function for use in tools that just need to apply the model
(for example, the mlflow deployments tool with the option -t sagemaker for deploying models
to Amazon SageMaker).
MLmodel file
All of the flavors that a particular model supports are defined in its MLmodel file in YAML
format. For example, running python examples/sklearn_logistic_regression/train.py from within the
MLflow repo
will create the following files under the model directory:
# Directory written by mlflow.sklearn.save_model(model, "model", input_example=...)
model/
├── MLmodel
├── model.pkl
├── conda.yaml
├── python_env.yaml
├── requirements.txt
├── input_example.json (optional, only logged when input example is provided and valid during model logging)
├── serving_input_example.json (optional, only logged when input example is provided and valid during model logging)
└── environment_variables.txt (optional, only logged when environment variables are used during model inference)
And its MLmodel file describes two flavors:
time_created: 2018-05-25T17:28:53.35

flavors:
  sklearn:
    sklearn_version: 0.19.1
    pickled_model: model.pkl
  python_function:
    loader_module: mlflow.sklearn
Apart from a flavors field listing the model flavors, the MLmodel YAML format can contain the following fields:
time_created: Date and time when the model was created, in UTC ISO 8601 format.run_id: ID of the run that created the model, if the model was saved using tracking.signature: model signature in JSON format.input_example: reference to an artifact with input example.databricks_runtime: Databricks runtime version and type, if the model was trained in a Databricks notebook or job.mlflow_version: The version of MLflow that was used to log the model.
Additional Logged Files
For environment recreation, we automatically log conda.yaml, python_env.yaml, and requirements.txt files whenever a model is logged.
These files can then be used to reinstall dependencies using conda or virtualenv with pip. Please see
How MLflow Model Records Dependencies for more details about these files.
If a model input example is provided when logging the model, two additional files input_example.json and serving_input_example.json are logged.
See Model Input Example for more details.
When logging a model, model metadata files (MLmodel, conda.yaml, python_env.yaml, requirements.txt) are copied to a subdirectory named metadata.
For wheeled models, original_requirements.txt file is also copied.
When a model registered in the MLflow Model Registry is downloaded, a YAML file named
registered_model_meta is added to the model directory on the downloader's side.
This file contains the name and version of the model referenced in the MLflow Model Registry,
and will be used for deployment and other purposes.
If you log a model within Databricks, MLflow also creates a metadata subdirectory within
the model directory. This subdirectory contains the lightweight copy of aforementioned
metadata files for internal use.
Environment variables file
MLflow records the environment variables that are used during model inference in environment_variables.txt
file when logging a model.
environment_variables.txt file only contains names of the environment variables that are used during
model inference, values are not stored.
Currently MLflow only logs the environment variables whose name contains any of the following keywords:
RECORD_ENV_VAR_ALLOWLIST = {
    # api key related
    "API_KEY",  # e.g. OPENAI_API_KEY
    "API_TOKEN",
    # databricks auth related
    "DATABRICKS_HOST",
    "DATABRICKS_USERNAME",
    "DATABRICKS_PASSWORD",
    "DATABRICKS_TOKEN",
    "DATABRICKS_INSECURE",
    "DATABRICKS_CLIENT_ID",
    "DATABRICKS_CLIENT_SECRET",
    "_DATABRICKS_WORKSPACE_HOST",
    "_DATABRICKS_WORKSPACE_ID",
}
Example of a pyfunc model that uses environment variables:
import mlflow
import os

os.environ["TEST_API_KEY"] = "test_api_key"


class MyModel(mlflow.pyfunc.PythonModel):
    def predict(self, context, model_input, params=None):
        if os.environ.get("TEST_API_KEY"):
            return model_input
        raise Exception("API key not found")


with mlflow.start_run():
    model_info = mlflow.pyfunc.log_model(
        name="model", python_model=MyModel(), input_example="data"
    )
Environment variable TEST_API_KEY is logged in the environment_variables.txt file like below
# This file records environment variable names that are used during model inference.
# They might need to be set when creating a serving endpoint from this model.
# Note: it is not guaranteed that all environment variables listed here are required
TEST_API_KEY
Before you deploy a model to a serving endpoint, review the environment_variables.txt file to ensure all necessary environment variables for model inference are set. Note that not all environment variables listed in the file are always required for model inference. For detailed instructions on setting environment variables on a databricks serving endpoint, refer to this guidance.
To disable this feature, set the environment variable MLFLOW_RECORD_ENV_VARS_IN_MODEL_LOGGING to false.
Managing Model Dependencies
An MLflow Model infers dependencies required for the model flavor and automatically logs them. However, it also allows you to define extra dependencies or custom Python code, and offer a tool to validate them in a sandbox environment. Please refer to Managing Dependencies in MLflow Models for more details.
Model Signatures And Input Examples
In MLflow, understanding the intricacies of model signatures and input examples is crucial for effective model management and deployment.
- Model Signature: Defines the schema for model inputs, outputs, and additional inference parameters, promoting a standardized interface for model interaction.
- Model Input Example: Provides a concrete instance of valid model input, aiding in understanding and testing model requirements. Additionally, if an input example is provided when logging a model, a model signature will be automatically inferred and stored if not explicitly provided.
- Model Serving Payload Example: Provides a json payload example for querying a deployed model endpoint.
If an input example is provided when logging a model, a serving payload example is automatically generated
from the input example and saved as
serving_input_example.json.
Our documentation delves into several key areas:
- Supported Signature Types: We cover the different data types that are supported, such as tabular data for traditional machine learning models and tensors for deep learning models.
- Signature Enforcement: Discusses how MLflow enforces schema compliance, ensuring that the provided inputs match the model's expectations.
- Logging Models with Signatures: Guides on how to incorporate signatures when logging models, enhancing clarity and reliability in model operations.
For a detailed exploration of these concepts, including examples and best practices, visit the Model Signatures and Examples Guide. If you would like to see signature enforcement in action, see the notebook tutorial on Model Signatures to learn more.
Model API
You can save and load MLflow Models in multiple ways. First, MLflow includes integrations with several common libraries. For example, mlflow.sklearn contains save_model, log_model, and load_model functions for scikit-learn models. Second, you can use the mlflow.models.Model class to create and write models. This class has four key functions:
- add_flavor to add a flavor to the model. Each flavor has a string name and a dictionary of key-value attributes, where the values can be any object that can be serialized to YAML.
- save to save the model to a local directory.
- log to log the model as an artifact in the current run using MLflow Tracking.
- load to load a model from a local directory or from an artifact in a previous run.
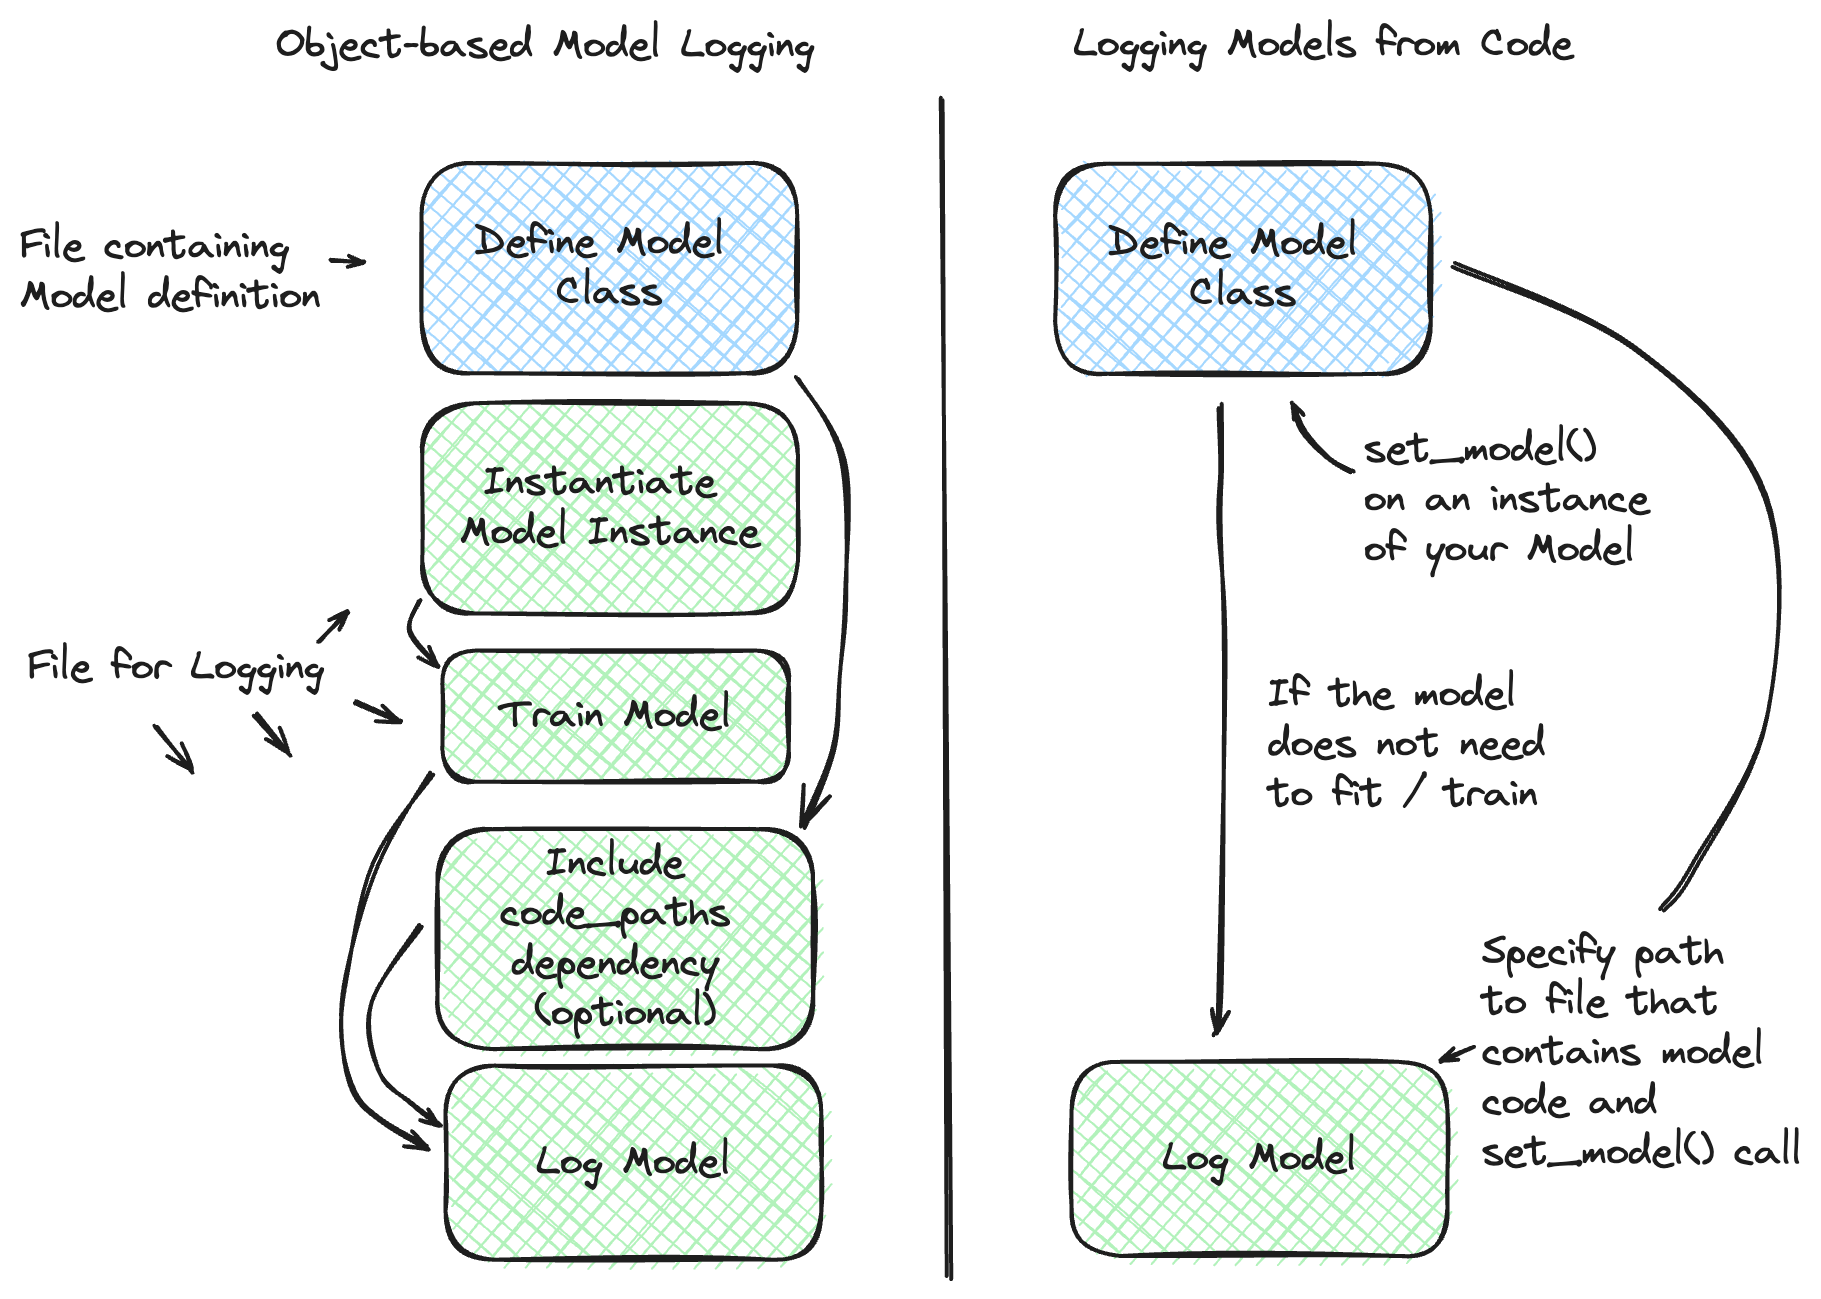
Models From Code
To learn more about the Models From Code feature, please visit the deep dive guide for more in-depth explanation and to see additional examples.
The Models from Code feature is available in MLflow versions 2.12.2 and later. This feature is experimental and may change in future releases.
The Models from Code feature allows you to define and log models directly from a stand-alone python script. This feature is particularly useful when you want to
log models that can be effectively stored as a code representation (models that do not need optimized weights through training) or applications
that rely on external services (e.g., LangChain chains). Another benefit is that this approach entirely bypasses the use of the pickle or
cloudpickle modules within Python, which can carry security risks when loading untrusted models.
This feature is only supported for LangChain, LlamaIndex, and PythonModel models.
In order to log a model from code, you can leverage the mlflow.models.set_model() API. This API allows you to define a model by specifying
an instance of the model class directly within the file where the model is defined. When logging such a model, a
file path is specified (instead of an object) that points to the Python file containing both the model class definition and the usage of the
set_model API applied on an instance of your custom model.
The figure below provides a comparison of the standard model logging process and the Models from Code feature for models that are eligible to be saved using the Models from Code feature:
For example, defining a model in a separate file named my_model.py:
import mlflow
from mlflow.models import set_model


class MyModel(mlflow.pyfunc.PythonModel):
    def predict(self, context, model_input):
        return model_input


# Define the custom PythonModel instance that will be used for inference
set_model(MyModel())
The Models from code feature does not support capturing import statements that are from external file references. If you have dependencies that
are not captured via a pip install, dependencies will need to be included and resolved via appropriate absolute path import references from
using the code_paths feature.
For simplicity's sake, it is recommended to encapsulate all of your required local dependencies for a model defined from code within the same
python script file due to limitations around code_paths dependency pathing resolution.
When defining a model from code and using the mlflow.models.set_model() API, the code that is defined in the script that is being logged
will be executed internally to ensure that it is valid code. If you have connections to external services within your script (e.g. you are connecting
to a GenAI service within LangChain), be aware that you will incur a connection request to that service when the model is being logged.
Then, logging the model from the file path in a different python script:
import mlflow

model_path = "my_model.py"

with mlflow.start_run():
    model_info = mlflow.pyfunc.log_model(
        python_model=model_path,  # Define the model as the path to the Python file
        name="my_model",
    )

# Loading the model behaves exactly as if an instance of MyModel had been logged
my_model = mlflow.pyfunc.load_model(model_info.model_uri)
The mlflow.models.set_model() API is not threadsafe. Do not attempt to use this feature if you are logging models concurrently
from multiple threads. This fluent API utilizes a global active model state that has no consistency guarantees. If you are interested in threadsafe
logging APIs, please use the mlflow.client.MlflowClient APIs for logging models.
Built-In Model Flavors
MLflow provides several standard flavors that might be useful in your applications. Specifically, many of its deployment tools support these flavors, so you can export your own model in one of these flavors to benefit from all these tools:
- Python Function (
python_function) - R Function (
crate) - H2O (
h2o) - Keras (
keras) - PyTorch (
pytorch) - Scikit-learn (
sklearn) - Spark MLlib (
spark) - TensorFlow (
tensorflow) - ONNX (
onnx) - XGBoost (
xgboost) - LightGBM (
lightgbm) - CatBoost (
catboost) - Spacy(
spaCy) - Statsmodels (
statsmodels) - Prophet (
prophet) - Pmdarima (
pmdarima) - John Snow Labs (
johnsnowlabs) - Diviner (
diviner) - Transformers (
transformers) - SentenceTransformers (
sentence_transformers)
Python Function (python_function)
The python_function model flavor serves as a default model interface for MLflow Python models.
Any MLflow Python model is expected to be loadable as a python_function model. This enables
other MLflow tools to work with any python model regardless of which persistence module or
framework was used to produce the model. This interoperability is very powerful because it allows
any Python model to be productionized in a variety of environments.
In addition, the python_function model flavor defines a generic
filesystem model format
for Python models and provides utilities for saving and loading models
to and from this format. The format is self-contained in the sense that it includes all the
information necessary to load and use a model. Dependencies are stored either directly with the
model or referenced via conda environment. This model format allows other tools to integrate
their models with MLflow.
How To Save Model As Python Function
Most python_function models are saved as part of other model flavors - for example, all mlflow
built-in flavors include the python_function flavor in the exported models. In addition,
the mlflow.pyfunc module defines functions for creating python_function models explicitly.
This module also includes utilities for creating custom Python models, which is a convenient way of
adding custom python code to ML models. For more information, see the custom Python models
documentation.
For information on how to store a custom model from a python script (models from code functionality), see the guide to models from code for the recommended approaches.
How To Load And Score Python Function Models
Loading Models
You can load python_function models in Python by using the mlflow.pyfunc.load_model() function. It is important
to note that load_model assumes all dependencies are already available and will not perform any checks or installations
of dependencies. For deployment options that handle dependencies, refer to the model deployment section.
Scoring Models
Once a model is loaded, it can be scored in two primary ways:
-
Synchronous Scoring The standard method for scoring is using the
predictmethod, which supports various input types and returns a scalar or collection based on the input data. The method signature is:predict(data: Union[pandas.Series, pandas.DataFrame, numpy.ndarray, csc_matrix, csr_matrix, List[Any], Dict[str, Any], str],
params: Optional[Dict[str, Any]] = None) → Union[pandas.Series, pandas.DataFrame, numpy.ndarray, list, str] -
Synchronous Streaming Scoring
notepredict_streamis a new interface that was added to MLflow in the 2.12.2 release. Previous versions of MLflow will not support this interface. In order to utilizepredict_streamin a custom Python Function Model, you must implement thepredict_streammethod in your model class and return a generator type.For models that support streaming data processing, predict_stream method is available. This method returns a
generator, which yields a stream of responses, allowing for efficient processing of large datasets or continuous data streams. Note that thepredict_streammethod is not available for all model types. The usage involves iterating over the generator to consume the responses:predict_stream(data: Any, params: Optional[Dict[str, Any]] = None) → GeneratorType
Demonstrating predict_stream()
Below is an example demonstrating how to define, save, load, and use a streamable model with the predict_stream() method:
import mlflow
import os


# Define a custom model that supports streaming
class StreamableModel(mlflow.pyfunc.PythonModel):
    def predict(self, context, model_input, params=None):
        # Regular predict method implementation (optional for this demo)
        return "regular-predict-output"

    def predict_stream(self, context, model_input, params=None):
        # Yielding elements one at a time
        for element in ["a", "b", "c", "d", "e"]:
            yield element


# Save the model to a directory
tmp_path = "/tmp/test_model"
pyfunc_model_path = os.path.join(tmp_path, "pyfunc_model")
python_model = StreamableModel()
mlflow.pyfunc.save_model(path=pyfunc_model_path, python_model=python_model)

# Load the model
loaded_pyfunc_model = mlflow.pyfunc.load_model(model_uri=pyfunc_model_path)

# Use predict_stream to get a generator
stream_output = loaded_pyfunc_model.predict_stream("single-input")

# Consuming the generator using next
print(next(stream_output))  # Output: 'a'
print(next(stream_output))  # Output: 'b'

# Alternatively, consuming the generator using a for-loop
for response in stream_output:
    print(response)  # This will print 'c', 'd', 'e'
Python Function Model Interfaces
All PyFunc models will support pandas.DataFrame as an input. In addition to pandas.DataFrame,
DL PyFunc models will also support tensor inputs in the form of numpy.ndarrays. To verify
whether a model flavor supports tensor inputs, please check the flavor's documentation.
For models with a column-based schema, inputs are typically provided in the form of a pandas.DataFrame.
If a dictionary mapping column name to values is provided as input for schemas with named columns or if a
python List or a numpy.ndarray is provided as input for schemas with unnamed columns, MLflow will cast the
input to a DataFrame. Schema enforcement and casting with respect to the expected data types is performed against
the DataFrame.
For models with a tensor-based schema, inputs are typically provided in the form of a numpy.ndarray or a
dictionary mapping the tensor name to its np.ndarray value. Schema enforcement will check the provided input's
shape and type against the shape and type specified in the model's schema and throw an error if they do not match.
For models where no schema is defined, no changes to the model inputs and outputs are made. MLflow will propagate any errors raised by the model if the model does not accept the provided input type.
The python environment that a PyFunc model is loaded into for prediction or inference may differ from the environment
in which it was trained. In the case of an environment mismatch, a warning message will be printed when
calling mlflow.pyfunc.load_model(). This warning statement will identify the packages that have a version mismatch
between those used during training and the current environment. In order to get the full dependencies of the
environment in which the model was trained, you can call mlflow.pyfunc.get_model_dependencies().
Furthermore, if you want to run model inference in the same environment used in model training, you can
call mlflow.pyfunc.spark_udf() with the env_manager argument set as "conda". This will generate the environment
from the conda.yaml file, ensuring that the python UDF will execute with the exact package versions that were used
during training.
Some PyFunc models may accept model load configuration, which controls how the model is loaded and predictions computed. You can learn which configuration the model supports by inspecting the model's flavor metadata:
model_info = mlflow.models.get_model_info(model_uri)
model_info.flavors[mlflow.pyfunc.FLAVOR_NAME][mlflow.pyfunc.MODEL_CONFIG]
Alternatively, you can load the PyFunc model and inspect the model_config property:
pyfunc_model = mlflow.pyfunc.load_model(model_uri)
pyfunc_model.model_config
Model configuration can be changed at loading time by indicating model_config parameter in
the mlflow.pyfunc.load_model() method:
pyfunc_model = mlflow.pyfunc.load_model(model_uri, model_config=dict(temperature=0.93))
When a model configuration value is changed, those values the configuration the model was saved with. Indicating an invalid model configuration key for a model results in that configuration being ignored. A warning is displayed mentioning the ignored entries.
Model configuration vs parameters with default values in signatures: Use model configuration when you need to provide
model publishers for a way to change how the model is loaded into memory and how predictions are computed for all the
samples. For instance, a key like user_gpu. Model consumers are not able to change those values at predict time. Use
parameters with default values in the signature to provide a users the ability to change how predictions are computed on
each data sample.
R Function (crate)
The crate model flavor defines a generic model format for representing an arbitrary R prediction
function as an MLflow model using the crate function from the
carrier package. The prediction function is expected to take a dataframe as input and
produce a dataframe, a vector or a list with the predictions as output.
This flavor requires R to be installed in order to be used.
crate usage
For a minimal crate model, an example configuration for the predict function is:
library(mlflow)
library(carrier)
# Load iris dataset
data("iris")

# Learn simple linear regression model
model <- lm(Sepal.Width~Sepal.Length, data = iris)

# Define a crate model
# call package functions with an explicit :: namespace.
crate_model <- crate(
  function(new_obs)  stats::predict(model, data.frame("Sepal.Length" = new_obs)),
  model = model
)

# log the model
model_path <- mlflow_log_model(model = crate_model, artifact_path = "iris_prediction")

# load the logged model and make a prediction
model_uri <- paste0(mlflow_get_run()$artifact_uri, "/iris_prediction")
mlflow_model <- mlflow_load_model(model_uri = model_uri,
                                  flavor = NULL,
                                  client = mlflow_client())

prediction <- mlflow_predict(model = mlflow_model, data = 5)
print(prediction)
H2O (h2o)
The h2o model flavor enables logging and loading H2O models.
The mlflow.h2o module defines save_model()
and log_model() methods in python,
and mlflow_save_model
and mlflow_log_model in R for saving H2O
models in MLflow Model format. These methods produce MLflow Models with the python_function flavor, allowing you to load them
as generic Python functions for inference via mlflow.pyfunc.load_model().
This loaded PyFunc model can be scored with only DataFrame input. When you load
MLflow Models with the h2o flavor using mlflow.pyfunc.load_model(),
the h2o.init() method is
called. Therefore, the correct version of h2o(-py) must be installed in the loader's
environment. You can customize the arguments given to
h2o.init() by modifying the
init entry of the persisted H2O model's YAML configuration file: model.h2o/h2o.yaml.
Finally, you can use the mlflow.h2o.load_model() method to load MLflow Models with the
h2o flavor as H2O model objects.
For more information, see mlflow.h2o.
h2o pyfunc usage
For a minimal h2o model, here is an example of the pyfunc predict() method in a classification scenario:
import mlflow
import h2o

h2o.init()
from h2o.estimators.glm import H2OGeneralizedLinearEstimator

# import the prostate data
df = h2o.import_file(
    "http://s3.amazonaws.com/h2o-public-test-data/smalldata/prostate/prostate.csv.zip"
)

# convert the columns to factors
df["CAPSULE"] = df["CAPSULE"].asfactor()
df["RACE"] = df["RACE"].asfactor()
df["DCAPS"] = df["DCAPS"].asfactor()
df["DPROS"] = df["DPROS"].asfactor()

# split the data
train, test, valid = df.split_frame(ratios=[0.7, 0.15])

# generate a GLM model
glm_classifier = H2OGeneralizedLinearEstimator(
    family="binomial", lambda_=0, alpha=0.5, nfolds=5, compute_p_values=True
)

with mlflow.start_run():
    glm_classifier.train(
        y="CAPSULE", x=["AGE", "RACE", "VOL", "GLEASON"], training_frame=train
    )
    metrics = glm_classifier.model_performance()
    metrics_to_track = ["MSE", "RMSE", "r2", "logloss"]
    metrics_to_log = {
        key: value
        for key, value in metrics._metric_json.items()
        if key in metrics_to_track
    }
    params = glm_classifier.params
    mlflow.log_params(params)
    mlflow.log_metrics(metrics_to_log)
    model_info = mlflow.h2o.log_model(glm_classifier, name="h2o_model_info")

# load h2o model and make a prediction
h2o_pyfunc = mlflow.pyfunc.load_model(model_uri=model_info.model_uri)
test_df = test.as_data_frame()
predictions = h2o_pyfunc.predict(test_df)
print(predictions)

# it is also possible to load the model and predict using h2o methods on the h2o frame

# h2o_model = mlflow.h2o.load_model(model_info.model_uri)
# predictions = h2o_model.predict(test)
Keras (keras)
The full guide for using the keras flavor can be viewed here.
PyTorch (pytorch)
The full guide for using the pytorch flavor can be viewed here.
For more information, see mlflow.pytorch.
Scikit-learn (sklearn)
The full guide for using the sklearn flavor can be viewed here.
For API information, see mlflow.sklearn.
Spark MLlib (spark)
The full guide for using the spark flavor can be viewed here.
For more information, see mlflow.spark.
TensorFlow (tensorflow)
The full guide for the tensorflow integration can be viewed here.
ONNX (onnx)
The onnx model flavor enables logging of ONNX models in MLflow format via
the mlflow.onnx.save_model() and mlflow.onnx.log_model() methods. These
methods also add the python_function flavor to the MLflow Models that they produce, allowing the
models to be interpreted as generic Python functions for inference via mlflow.pyfunc.load_model().
This loaded PyFunc model can be scored with both DataFrame input and numpy array input. The python_function
representation of an MLflow ONNX model uses the ONNX Runtime execution engine
for evaluation. Finally, you can use the mlflow.onnx.load_model() method to load MLflow
Models with the onnx flavor in native ONNX format.
For more information, see mlflow.onnx and http://onnx.ai/.
The default behavior for saving ONNX files is to use the ONNX save option save_as_external_data=True
in order to support model files that are in excess of 2GB. For edge deployments of small model files, this
may create issues. If you need to save a small model as a single file for such deployment considerations,
you can set the parameter save_as_external_data=False in either mlflow.onnx.save_model()
or mlflow.onnx.log_model() to force the serialization of the model as a small file. Note that if the
model is in excess of 2GB, saving as a single file will not work.
ONNX pyfunc usage example
For an ONNX model, an example configuration that uses pytorch to train a dummy model, converts it to ONNX, logs to mlflow and makes a prediction using pyfunc predict() method is:
import numpy as np
import mlflow
from mlflow.models import infer_signature
import onnx
import torch
from torch import nn

# define a torch model
net = nn.Linear(6, 1)
loss_function = nn.L1Loss()
optimizer = torch.optim.Adam(net.parameters(), lr=1e-4)

X = torch.randn(6)
y = torch.randn(1)

# run model training
epochs = 5
for epoch in range(epochs):
    optimizer.zero_grad()
    outputs = net(X)

    loss = loss_function(outputs, y)
    loss.backward()

    optimizer.step()

# convert model to ONNX and load it
torch.onnx.export(net, X, "model.onnx")
onnx_model = onnx.load_model("model.onnx")

# log the model into a mlflow run
with mlflow.start_run():
    signature = infer_signature(X.numpy(), net(X).detach().numpy())
    model_info = mlflow.onnx.log_model(onnx_model, name="model", signature=signature)

# load the logged model and make a prediction
onnx_pyfunc = mlflow.pyfunc.load_model(model_info.model_uri)

predictions = onnx_pyfunc.predict(X.numpy())
print(predictions)
XGBoost (xgboost)
The full guide for the xgboost integration can be viewed here.
For more information, see mlflow.xgboost.
LightGBM (lightgbm)
The lightgbm model flavor enables logging of LightGBM models
in MLflow format via the mlflow.lightgbm.save_model() and mlflow.lightgbm.log_model() methods.
These methods also add the python_function flavor to the MLflow Models that they produce, allowing the
models to be interpreted as generic Python functions for inference via mlflow.pyfunc.load_model().
You can also use the mlflow.lightgbm.load_model() method to load MLflow Models with the lightgbm
model flavor in native LightGBM format.
Note that the scikit-learn API for LightGBM is now supported. For more information, see mlflow.lightgbm.
LightGBM pyfunc usage
The example below
- Loads the IRIS dataset from
scikit-learn - Trains a LightGBM
LGBMClassifier - Logs the model and feature importance's using
mlflow - Loads the logged model and makes predictions
from lightgbm import LGBMClassifier
from sklearn.datasets import load_iris
from sklearn.model_selection import train_test_split
import mlflow
from mlflow.models import infer_signature

data = load_iris()

# Remove special characters from feature names to be able to use them as keys for mlflow metrics
feature_names = [
    name.replace(" ", "_").replace("(", "").replace(")", "")
    for name in data["feature_names"]
]
X_train, X_test, y_train, y_test = train_test_split(
    data["data"], data["target"], test_size=0.2
)
# create model instance
lgb_classifier = LGBMClassifier(
    n_estimators=10,
    max_depth=3,
    learning_rate=1,
    objective="binary:logistic",
    random_state=123,
)

# Fit and save model and LGBMClassifier feature importances as mlflow metrics
with mlflow.start_run():
    lgb_classifier.fit(X_train, y_train)
    feature_importances = dict(zip(feature_names, lgb_classifier.feature_importances_))
    feature_importance_metrics = {
        f"feature_importance_{feature_name}": imp_value
        for feature_name, imp_value in feature_importances.items()
    }
    mlflow.log_metrics(feature_importance_metrics)
    signature = infer_signature(X_train, lgb_classifier.predict(X_train))
    model_info = mlflow.lightgbm.log_model(
        lgb_classifier, name="iris-classifier", signature=signature
    )

# Load saved model and make predictions
lgb_classifier_saved = mlflow.pyfunc.load_model(model_info.model_uri)
y_pred = lgb_classifier_saved.predict(X_test)
print(y_pred)
CatBoost (catboost)
The catboost model flavor enables logging of CatBoost models
in MLflow format via the mlflow.catboost.save_model() and mlflow.catboost.log_model() methods.
These methods also add the python_function flavor to the MLflow Models that they produce, allowing the
models to be interpreted as generic Python functions for inference via mlflow.pyfunc.load_model().
You can also use the mlflow.catboost.load_model() method to load MLflow Models with the catboost
model flavor in native CatBoost format.
For more information, see mlflow.catboost.
CatBoost pyfunc usage
For a CatBoost Classifier model, an example configuration for the pyfunc predict() method is:
import mlflow
from mlflow.models import infer_signature
from catboost import CatBoostClassifier
from sklearn import datasets

# prepare data
X, y = datasets.load_wine(as_frame=False, return_X_y=True)

# train the model
model = CatBoostClassifier(
    iterations=5,
    loss_function="MultiClass",
    allow_writing_files=False,
)
model.fit(X, y)

# create model signature
predictions = model.predict(X)
signature = infer_signature(X, predictions)

# log the model into a mlflow run
with mlflow.start_run():
    model_info = mlflow.catboost.log_model(model, name="model", signature=signature)

# load the logged model and make a prediction
catboost_pyfunc = mlflow.pyfunc.load_model(model_uri=model_info.model_uri)
print(catboost_pyfunc.predict(X[:5]))
Spacy(spaCy)
The full guide for the spaCy integration can be viewed here.
Statsmodels (statsmodels)
The statsmodels model flavor enables logging of Statsmodels models
in MLflow format via the mlflow.statsmodels.save_model()
and mlflow.statsmodels.log_model() methods. These methods also add the python_function
flavor to the MLflow Models that they produce, allowing the models to be interpreted as generic Python
functions for inference via mlflow.pyfunc.load_model(). This loaded PyFunc model can only
be scored with DataFrame input. You can also use the mlflow.statsmodels.load_model()
method to load MLflow Models with the statsmodels model flavor in native statsmodels format.
As for now, automatic logging is restricted to parameters, metrics and models generated by a call to fit
on a statsmodels model.
Statsmodels pyfunc usage
The following 2 examples illustrate usage of a basic regression model (OLS) and an ARIMA time series model from the following statsmodels apis : statsmodels.formula.api and statsmodels.tsa.api
For a minimal statsmodels regression model, here is an example of the pyfunc predict() method:
import mlflow
import pandas as pd
from sklearn.datasets import load_diabetes
import statsmodels.formula.api as smf

# load the diabetes dataset from sklearn
diabetes = load_diabetes()

# create X and y dataframes for the features and target
X = pd.DataFrame(data=diabetes.data, columns=diabetes.feature_names)
y = pd.DataFrame(data=diabetes.target, columns=["target"])

# concatenate X and y dataframes
df = pd.concat([X, y], axis=1)

# create the linear regression model (ordinary least squares)
model = smf.ols(
    formula="target ~ age + sex + bmi + bp + s1 + s2 + s3 + s4 + s5 + s6", data=df
)

mlflow.statsmodels.autolog(
    log_models=True,
    disable=False,
    exclusive=False,
    disable_for_unsupported_versions=False,
    silent=False,
    registered_model_name=None,
)

with mlflow.start_run():
    res = model.fit(method="pinv", use_t=True)
    model_info = mlflow.statsmodels.log_model(res, name="OLS_model")

# load the pyfunc model
statsmodels_pyfunc = mlflow.pyfunc.load_model(model_uri=model_info.model_uri)

# generate predictions
predictions = statsmodels_pyfunc.predict(X)
print(predictions)
For a minimal time series ARIMA model, here is an example of the pyfunc predict() method :
import mlflow
import numpy as np
import pandas as pd
from statsmodels.tsa.arima.model import ARIMA

# create a time series dataset with seasonality
np.random.seed(0)

# generate a time index with a daily frequency
dates = pd.date_range(start="2022-12-01", end="2023-12-01", freq="D")

# generate the seasonal component (weekly)
seasonality = np.sin(np.arange(len(dates)) * (2 * np.pi / 365.25) * 7)

# generate the trend component
trend = np.linspace(-5, 5, len(dates)) + 2 * np.sin(
    np.arange(len(dates)) * (2 * np.pi / 365.25) * 0.1
)

# generate the residual component
residuals = np.random.normal(0, 1, len(dates))

# generate the final time series by adding the components
time_series = seasonality + trend + residuals

# create a dataframe from the time series
data = pd.DataFrame({"date": dates, "value": time_series})
data.set_index("date", inplace=True)

order = (1, 0, 0)
# create the ARIMA model
model = ARIMA(data, order=order)

mlflow.statsmodels.autolog(
    log_models=True,
    disable=False,
    exclusive=False,
    disable_for_unsupported_versions=False,
    silent=False,
    registered_model_name=None,
)

with mlflow.start_run():
    res = model.fit()
    mlflow.log_params(
        {
            "order": order,
            "trend": model.trend,
            "seasonal_order": model.seasonal_order,
        }
    )
    mlflow.log_params(res.params)
    mlflow.log_metric("aic", res.aic)
    mlflow.log_metric("bic", res.bic)
    model_info = mlflow.statsmodels.log_model(res, name="ARIMA_model")

# load the pyfunc model
statsmodels_pyfunc = mlflow.pyfunc.load_model(model_uri=model_info.model_uri)

# prediction dataframes for a TimeSeriesModel must have exactly one row and include columns called start and end
start = pd.to_datetime("2024-01-01")
end = pd.to_datetime("2024-01-07")

# generate predictions
prediction_data = pd.DataFrame({"start": start, "end": end}, index=[0])
predictions = statsmodels_pyfunc.predict(prediction_data)
print(predictions)
For more information, see mlflow.statsmodels.
Prophet (prophet)
The full guide for the prophet integration can be viewed here.
For more information, see mlflow.prophet.
Pmdarima (pmdarima)
The pmdarima model flavor enables logging of pmdarima models in MLflow
format via the mlflow.pmdarima.save_model() and mlflow.pmdarima.log_model() methods.
These methods also add the python_function flavor to the MLflow Models that they produce, allowing the
model to be interpreted as generic Python functions for inference via mlflow.pyfunc.load_model().
This loaded PyFunc model can only be scored with a DataFrame input.
You can also use the mlflow.pmdarima.load_model() method to load MLflow Models with the pmdarima
model flavor in native pmdarima formats.
The interface for utilizing a pmdarima model loaded as a pyfunc type for generating forecast predictions uses
a single-row Pandas DataFrame configuration argument. The following columns in this configuration
Pandas DataFrame are supported:
n_periods(required) - specifies the number of future periods to generate starting from the last datetime value of the training dataset, utilizing the frequency of the input training series when the model was trained (for example, if the training data series elements represent one value per hour, in order to forecast 3 days of future data, set the columnn_periodsto72)X(optional) - exogenous regressor values (only supported in pmdarima version >= 1.8.0) a 2D array of values for future time period events. For more information, read the underlying library explanation.return_conf_int(optional) - a boolean (Default:False) for whether to return confidence interval values. See above note.alpha(optional) - the significance value for calculating confidence intervals. (Default:0.05)
An example configuration for the pyfunc predict of a pmdarima model is shown below, with a future period
prediction count of 100, a confidence interval calculation generation, no exogenous regressor elements, and a default
alpha of 0.05:
| Index | n-periods | return_conf_int |
|---|---|---|
| 0 | 100 | True |
The Pandas DataFrame passed to a pmdarima pyfunc flavor must only contain 1 row.
When predicting a pmdarima flavor, the predict method's DataFrame configuration column
return_conf_int's value controls the output format. When the column's value is set to False or None
(which is the default if this column is not supplied in the configuration DataFrame), the schema of the
returned Pandas DataFrame is a single column: ["yhat"]. When set to True, the schema of the returned
DataFrame is: ["yhat", "yhat_lower", "yhat_upper"] with the respective lower (yhat_lower) and
upper (yhat_upper) confidence intervals added to the forecast predictions (yhat).
Example usage of pmdarima artifact loaded as a pyfunc with confidence intervals calculated:
import pmdarima
import mlflow
import pandas as pd

data = pmdarima.datasets.load_airpassengers()

with mlflow.start_run():
    model = pmdarima.auto_arima(data, seasonal=True)
    mlflow.pmdarima.save_model(model, "/tmp/model.pmd")

loaded_pyfunc = mlflow.pyfunc.load_model("/tmp/model.pmd")

prediction_conf = pd.DataFrame(
    [{"n_periods": 4, "return_conf_int": True, "alpha": 0.1}]
)

predictions = loaded_pyfunc.predict(prediction_conf)
Output (Pandas DataFrame):
| Index | yhat | yhat_lower | yhat_upper |
|---|---|---|---|
| 0 | 467.573731 | 423.30995 | 511.83751 |
| 1 | 490.494467 | 416.17449 | 564.81444 |
| 2 | 509.138684 | 420.56255 | 597.71117 |
| 3 | 492.554714 | 397.30634 | 587.80309 |
Signature logging for pmdarima will not function correctly if return_conf_int is set to True from
a non-pyfunc artifact. The output of the native ARIMA.predict() when returning confidence intervals is not
a recognized signature type.
John Snow Labs (johnsnowlabs)
The johnsnowlabs model flavor gives you access to
20.000+ state-of-the-art enterprise NLP models in 200+ languages
for medical, finance, legal and many more domains.
You can use mlflow.johnsnowlabs.log_model() to log and export your model as
This enables you to integrate any John Snow Labs model
into the MLflow framework. You can easily deploy your models for inference with MLflows serve functionalities.
Models are interpreted as a generic Python function for inference via mlflow.pyfunc.load_model().
You can also use the mlflow.johnsnowlabs.load_model() function to load a saved or logged MLflow
Model with the johnsnowlabs flavor from an stored artifact.
Features include: LLM's, Text Summarization, Question Answering, Named Entity Recognition, Relation Extraction, Sentiment Analysis, Spell Checking, Image Classification, Automatic Speech Recognition and much more, powered by the latest Transformer Architectures. The models are provided by John Snow Labs and requires a John Snow Labs Enterprise NLP License. You can reach out to us for a research or industry license.
Example: Export a John Snow Labs to MLflow format
import json
import os

import pandas as pd
from johnsnowlabs import nlp

import mlflow
from mlflow.pyfunc import spark_udf

# 1) Write your raw license.json string into the 'JOHNSNOWLABS_LICENSE_JSON' env variable for MLflow
creds = {
    "AWS_ACCESS_KEY_ID": "...",
    "AWS_SECRET_ACCESS_KEY": "...",
    "SPARK_NLP_LICENSE": "...",
    "SECRET": "...",
}
os.environ["JOHNSNOWLABS_LICENSE_JSON"] = json.dumps(creds)

# 2) Install enterprise libraries
nlp.install()
# 3) Start a Spark session with enterprise libraries
spark = nlp.start()

# 4) Load a model and test it
nlu_model = "en.classify.bert_sequence.covid_sentiment"
model_save_path = "my_model"
johnsnowlabs_model = nlp.load(nlu_model)
johnsnowlabs_model.predict(["I hate COVID,", "I love COVID"])

# 5) Export model with pyfunc and johnsnowlabs flavors
with mlflow.start_run():
    model_info = mlflow.johnsnowlabs.log_model(johnsnowlabs_model, name=model_save_path)

# 6) Load model with johnsnowlabs flavor
mlflow.johnsnowlabs.load_model(model_info.model_uri)

# 7) Load model with pyfunc flavor
mlflow.pyfunc.load_model(model_save_path)

pandas_df = pd.DataFrame({"text": ["Hello World"]})
spark_df = spark.createDataFrame(pandas_df).coalesce(1)
pyfunc_udf = spark_udf(
    spark=spark,
    model_uri=model_save_path,
    env_manager="virtualenv",
    result_type="string",
)
new_df = spark_df.withColumn("prediction", pyfunc_udf(*pandas_df.columns))

# 9) You can now use the mlflow models serve command to serve the model see next section

# 10)  You can also use x command to deploy model inside of a container see next section
To deploy the John Snow Labs model as a container
- Start the Docker Container
docker run -p 5001:8080 -e JOHNSNOWLABS_LICENSE_JSON=your_json_string "mlflow-pyfunc"
- Query server
curl http://127.0.0.1:5001/invocations -H 'Content-Type: application/json' -d '{
  "dataframe_split": {
      "columns": ["text"],
      "data": [["I hate covid"], ["I love covid"]]
  }
}'
To deploy the John Snow Labs model without a container
- Export env variable and start server
export JOHNSNOWLABS_LICENSE_JSON=your_json_string
mlflow models serve -m <model_uri>
- Query server
curl http://127.0.0.1:5000/invocations -H 'Content-Type: application/json' -d '{
  "dataframe_split": {
      "columns": ["text"],
      "data": [["I hate covid"], ["I love covid"]]
  }
}'
Diviner (diviner)
The diviner model flavor enables logging of diviner models
in MLflow format via the mlflow.diviner.save_model() and mlflow.diviner.log_model() methods.
These methods also add the python_function flavor to the MLflow Models that they produce, allowing the model to be
interpreted as generic Python functions for inference via mlflow.pyfunc.load_model().
This loaded PyFunc model can only be scored with a DataFrame input.
You can also use the mlflow.diviner.load_model() method to load MLflow Models with the diviner
model flavor in native diviner formats.
Diviner Types
Diviner is a library that provides an orchestration framework for performing time series forecasting on groups of
related series. Forecasting in diviner is accomplished through wrapping popular open source libraries such as
prophet and pmdarima. The diviner
library offers a simplified set of APIs to simultaneously generate distinct time series forecasts for multiple data
groupings using a single input DataFrame and a unified high-level API.
Metrics and Parameters logging for Diviner
Unlike other flavors that are supported in MLflow, Diviner has the concept of grouped models. As a collection of many
(perhaps thousands) of individual forecasting models, the burden to the tracking server to log individual metrics
and parameters for each of these models is significant. For this reason, metrics and parameters are exposed for
retrieval from Diviner's APIs as Pandas DataFrames, rather than discrete primitive values.
To illustrate, let us assume we are forecasting hourly electricity consumption from major cities around the world. A sample of our input data looks like this:
| country | city | datetime | watts |
|---|---|---|---|
| US | NewYork | 2022-03-01 00:01:00 | 23568.9 |
| US | NewYork | 2022-03-01 00:02:00 | 22331.7 |
| US | Boston | 2022-03-01 00:01:00 | 14220.1 |
| US | Boston | 2022-03-01 00:02:00 | 14183.4 |
| CA | Toronto | 2022-03-01 00:01:00 | 18562.2 |
| CA | Toronto | 2022-03-01 00:02:00 | 17681.6 |
| MX | MexicoCity | 2022-03-01 00:01:00 | 19946.8 |
| MX | MexicoCity | 2022-03-01 00:02:00 | 19444.0 |
If we were to fit a model on this data, supplying the grouping keys as:
grouping_keys = ["country", "city"]
We will have a model generated for each of the grouping keys that have been supplied:
[("US", "NewYork"), ("US", "Boston"), ("CA", "Toronto"), ("MX", "MexicoCity")]
With a model constructed for each of these, entering each of their metrics and parameters wouldn't be an issue for the MLflow tracking server. What would become a problem, however, is if we modeled each major city on the planet and ran this forecasting scenario every day. If we were to adhere to the conditions of the World Bank, that would mean just over 10,000 models as of 2022. After a mere few weeks of running this forecasting every day we would have a very large metrics table.
To eliminate this issue for large-scale forecasting, the metrics and parameters for diviner are extracted as a
grouping key indexed Pandas DataFrame, as shown below for example (float values truncated for visibility):
| grouping_key_columns | country | city | mse | rmse | mae | mape | mdape | smape |
|---|---|---|---|---|---|---|---|---|
| ("country", "city") | CA | Toronto | 8276851.6 | 2801.7 | 2417.7 | 0.16 | 0.16 | 0.159 |
| ("country", "city") | MX | MexicoCity | 3548872.4 | 1833.8 | 1584.5 | 0.15 | 0.16 | 0.159 |
| ("country", "city") | US | NewYork | 3167846.4 | 1732.4 | 1498.2 | 0.15 | 0.16 | 0.158 |
| ("country", "city") | US | Boston | 14082666.4 | 3653.2 | 3156.2 | 0.15 | 0.16 | 0.159 |
There are two recommended means of logging the metrics and parameters from a diviner model :
- Writing the DataFrames to local storage and using
mlflow.log_artifacts()
import os
import mlflow
import tempfile

with tempfile.TemporaryDirectory() as tmpdir:
    params = model.extract_model_params()
    metrics = model.cross_validate_and_score(
        horizon="72 hours",
        period="240 hours",
        initial="480 hours",
        parallel="threads",
        rolling_window=0.1,
        monthly=False,
    )
    params.to_csv(f"{tmpdir}/params.csv", index=False, header=True)
    metrics.to_csv(f"{tmpdir}/metrics.csv", index=False, header=True)

    mlflow.log_artifacts(tmpdir, artifact_path="data")
- Writing directly as a JSON artifact using
mlflow.log_dict()
The parameters extract from diviner models may require casting (or dropping of columns) if using the
pd.DataFrame.to_dict() approach due to the inability of this method to serialize objects.
import mlflow

params = model.extract_model_params()
metrics = model.cross_validate_and_score(
    horizon="72 hours",
    period="240 hours",
    initial="480 hours",
    parallel="threads",
    rolling_window=0.1,
    monthly=False,
)
params["t_scale"] = params["t_scale"].astype(str)
params["start"] = params["start"].astype(str)
params = params.drop("stan_backend", axis=1)

mlflow.log_dict(params.to_dict(), "params.json")
mlflow.log_dict(metrics.to_dict(), "metrics.json")
Logging of the model artifact is shown in the pyfunc example below.
Diviner pyfunc usage
The MLflow Diviner flavor includes an implementation of the pyfunc interface for Diviner models. To control
prediction behavior, you can specify configuration arguments in the first row of a Pandas DataFrame input.
As this configuration is dependent upon the underlying model type (i.e., the diviner.GroupedProphet.forecast()
method has a different signature than does diviner.GroupedPmdarima.predict()), the Diviner pyfunc implementation
attempts to coerce arguments to the types expected by the underlying model.
Diviner models support both "full group" and "partial group" forecasting. If a column named "groups" is present
in the configuration DataFrame submitted to the pyfunc flavor, the grouping key values in the first row
will be used to generate a subset of forecast predictions. This functionality removes the need to filter a subset
from the full output of all groups forecasts if the results of only a few (or one) groups are needed.
For a GroupedPmdarima model, an example configuration for the pyfunc predict() method is:
import mlflow
import pandas as pd
from pmdarima.arima.auto import AutoARIMA
from diviner import GroupedPmdarima

with mlflow.start_run():
    base_model = AutoARIMA(out_of_sample_size=96, maxiter=200)
    model = GroupedPmdarima(model_template=base_model).fit(
        df=df,
        group_key_columns=["country", "city"],
        y_col="watts",
        datetime_col="datetime",
        silence_warnings=True,
    )

    mlflow.diviner.save_model(diviner_model=model, path="/tmp/diviner_model")

diviner_pyfunc = mlflow.pyfunc.load_model(model_uri="/tmp/diviner_model")

predict_conf = pd.DataFrame(
    {
        "n_periods": 120,
        "groups": [
            ("US", "NewYork"),
            ("CA", "Toronto"),
            ("MX", "MexicoCity"),
        ],  # NB: List of tuples required.
        "predict_col": "wattage_forecast",
        "alpha": 0.1,
        "return_conf_int": True,
        "on_error": "warn",
    },
    index=[0],
)

subset_forecasts = diviner_pyfunc.predict(predict_conf)
There are several instances in which a configuration DataFrame submitted to the pyfunc predict() method
will cause an MlflowException to be raised:
- If neither
horizonorn_periodsare provided. - The value of
n_periodsorhorizonis not an integer. - If the model is of type
GroupedProphet,frequencyas a string type must be provided. - If both
horizonandn_periodsare provided with different values.
Transformers (transformers)
The full guide, including tutorials and detailed documentation for using the transformers integration can be found here.
SentenceTransformers (sentence_transformers)
The full guide for the sentence-transformers integration can be viewed here.
Model Evaluation
The MLflow evaluation documentation has been relocated and can be found here.
Model Customization
While MLflow's built-in model persistence utilities are convenient for packaging models from various popular ML libraries in MLflow Model format, they do not cover every use case. For example, you may want to use a model from an ML library that is not explicitly supported by MLflow's built-in flavors. Alternatively, you may want to package custom inference code and data to create an MLflow Model. Fortunately, MLflow provides two solutions that can be used to accomplish these tasks: Custom Python Models and Custom Flavors.
In this section:
Custom Python Models
The mlflow.pyfunc module provides save_model()
and log_model() utilities for creating MLflow Models with the
python_function flavor that contain user-specified code and artifact (file) dependencies.
These artifact dependencies may include serialized models produced by any Python ML library.
Because these custom models contain the python_function flavor, they can be deployed
to any of MLflow's supported production environments, such as SageMaker, AzureML, or local
REST endpoints.
The following examples demonstrate how you can use the mlflow.pyfunc
module to create custom Python models. For additional information about model customization with MLflow's
python_function utilities, see the python_function custom models documentation.
Example: Creating a model with type hints
This example demonstrates how to create a custom Python model with type hints, enabling MLflow to perform data validation based on the type hints specified for the model input. For additional information about PythonModel type hints support, see the PythonModel Type Hints Guide.
PythonModel with type hints supports data validation starting from MLflow version 2.20.0.
import pydantic
import mlflow
from mlflow.pyfunc import PythonModel


# Define the pydantic model input
class Message(pydantic.BaseModel):
    role: str
    content: str


class CustomModel(PythonModel):
    # Define the model_input type hint
    # NB: it must be list[...], check the python model type hints guide for more information
    def predict(self, model_input: list[Message], params=None) -> list[str]:
        return [m.content for m in model_input]


# Construct the model and test
model = CustomModel()

# The input_example can be a list of Message objects as defined in the type hint
input_example = [
    Message(role="system", content="Hello"),
    Message(role="user", content="Hi"),
]
assert model.predict(input_example) == ["Hello", "Hi"]

# The input example can also be a list of dictionaries that match the Message schema
input_example = [
    {"role": "system", "content": "Hello"},
    {"role": "user", "content": "Hi"},
]
assert model.predict(input_example) == ["Hello", "Hi"]

# Log the model
with mlflow.start_run():
    model_info = mlflow.pyfunc.log_model(
        name="model",
        python_model=model,
        input_example=input_example,
    )

# Load the model as pyfunc
pyfunc_model = mlflow.pyfunc.load_model(model_info.model_uri)
assert pyfunc_model.predict(input_example) == ["Hello", "Hi"]
Example: Creating a custom “add n” model
This example defines a class for a custom model that adds a specified numeric value, n, to all
columns of a Pandas DataFrame input. Then, it uses the mlflow.pyfunc
APIs to save an instance of this model with n = 5 in MLflow Model format. Finally, it loads the model in
python_function format and uses it to evaluate a sample input.
import mlflow.pyfunc


# Define the model class
class AddN(mlflow.pyfunc.PythonModel):
    def __init__(self, n):
        self.n = n

    def predict(self, context, model_input, params=None):
        return model_input.apply(lambda column: column + self.n)


# Construct and save the model
model_path = "add_n_model"
add5_model = AddN(n=5)
mlflow.pyfunc.save_model(path=model_path, python_model=add5_model)

# Load the model in `python_function` format
loaded_model = mlflow.pyfunc.load_model(model_path)

# Evaluate the model
import pandas as pd

model_input = pd.DataFrame([range(10)])
model_output = loaded_model.predict(model_input)
assert model_output.equals(pd.DataFrame([range(5, 15)]))
Example: Saving an XGBoost model in MLflow format
This example begins by training and saving a gradient boosted tree model using the XGBoost
library. Next, it defines a wrapper class around the XGBoost model that conforms to MLflow's
python_function inference API.
Then, it uses the wrapper class and the saved XGBoost model to construct an MLflow Model that performs inference using the gradient
boosted tree. Finally, it loads the MLflow Model in python_function format and uses it to
evaluate test data.
# Load training and test datasets
from sys import version_info
import xgboost as xgb
from sklearn import datasets
from sklearn.model_selection import train_test_split

PYTHON_VERSION = f"{version_info.major}.{version_info.minor}.{version_info.micro}"
iris = datasets.load_iris()
x = iris.data[:, 2:]
y = iris.target
x_train, x_test, y_train, _ = train_test_split(x, y, test_size=0.2, random_state=42)
dtrain = xgb.DMatrix(x_train, label=y_train)

# Train and save an XGBoost model
xgb_model = xgb.train(params={"max_depth": 10}, dtrain=dtrain, num_boost_round=10)
xgb_model_path = "xgb_model.pth"
xgb_model.save_model(xgb_model_path)

# Create an `artifacts` dictionary that assigns a unique name to the saved XGBoost model file.
# This dictionary will be passed to `mlflow.pyfunc.save_model`, which will copy the model file
# into the new MLflow Model's directory.
artifacts = {"xgb_model": xgb_model_path}

# Define the model class
import mlflow.pyfunc


class XGBWrapper(mlflow.pyfunc.PythonModel):
    def load_context(self, context):
        import xgboost as xgb

        self.xgb_model = xgb.Booster()
        self.xgb_model.load_model(context.artifacts["xgb_model"])

    def predict(self, context, model_input, params=None):
        input_matrix = xgb.DMatrix(model_input.values)
        return self.xgb_model.predict(input_matrix)


# Create a Conda environment for the new MLflow Model that contains all necessary dependencies.
import cloudpickle

conda_env = {
    "channels": ["defaults"],
    "dependencies": [
        f"python={PYTHON_VERSION}",
        "pip",
        {
            "pip": [
                f"mlflow=={mlflow.__version__}",
                f"xgboost=={xgb.__version__}",
                f"cloudpickle=={cloudpickle.__version__}",
            ],
        },
    ],
    "name": "xgb_env",
}

# Save the MLflow Model
mlflow_pyfunc_model_path = "xgb_mlflow_pyfunc"
mlflow.pyfunc.save_model(
    path=mlflow_pyfunc_model_path,
    python_model=XGBWrapper(),
    artifacts=artifacts,
    conda_env=conda_env,
)

# Load the model in `python_function` format
loaded_model = mlflow.pyfunc.load_model(mlflow_pyfunc_model_path)

# Evaluate the model
import pandas as pd

test_predictions = loaded_model.predict(pd.DataFrame(x_test))
print(test_predictions)
Example: Logging a transformers model with hf:/ schema to avoid copying large files
This example shows how to use a special schema hf:/ to log a transformers model from huggingface
hub directly. This is useful when the model is too large and especially when you want to serve the
model directly, but it doesn't save extra space if you want to download and test the model locally.
import mlflow
from mlflow.models import infer_signature
import numpy as np
import transformers


# Define a custom PythonModel
class QAModel(mlflow.pyfunc.PythonModel):
    def load_context(self, context):
        """
        This method initializes the tokenizer and language model
        using the specified snapshot location from model context.
        """
        snapshot_location = context.artifacts["bert-tiny-model"]
        # Initialize tokenizer and language model
        tokenizer = transformers.AutoTokenizer.from_pretrained(snapshot_location)
        model = transformers.BertForQuestionAnswering.from_pretrained(snapshot_location)
        self.pipeline = transformers.pipeline(
            task="question-answering", model=model, tokenizer=tokenizer
        )

    def predict(self, context, model_input, params=None):
        question = model_input["question"][0]
        if isinstance(question, np.ndarray):
            question = question.item()
        ctx = model_input["context"][0]
        if isinstance(ctx, np.ndarray):
            ctx = ctx.item()
        return self.pipeline(question=question, context=ctx)


# Log the model
data = {"question": "Who's house?", "context": "The house is owned by Run."}
pyfunc_artifact_path = "question_answering_model"
with mlflow.start_run() as run:
    model_info = mlflow.pyfunc.log_model(
        name=pyfunc_artifact_path,
        python_model=QAModel(),
        artifacts={"bert-tiny-model": "hf:/prajjwal1/bert-tiny"},
        input_example=data,
        signature=infer_signature(data, ["Run"]),
        extra_pip_requirements=["torch", "accelerate", "transformers", "numpy"],
    )
Custom Flavors
To read about how to build custom integrations and to see examples of community-developed extended library support, check out the Community Model Flavors page.
Validate Models before Deployment
After logging your model with MLflow Tracking, it is highly recommended to validate the model locally before deploying it to production.
The mlflow.models.predict() API provides a convenient way to test your model in a virtual environment, offering isolated execution and several advantages:
- Model dependencies validation: The API helps ensure that the dependencies logged with the model are correct and sufficient by executing the model with an input example in a virtual environment. For more details, refer to Validating Environment for Prediction.
- Input data validation: The API can be used to validate the input data interacts with the model as expected by simulating the same data processing during model serving. Ensure that the input data is a valid example that aligns with the pyfunc model’s predict function requirements.
- Extra environment variables validation: By specifying the
extra_envsparameter, you can test whether additional environment variables are required for the model to run successfully. Note that all existing environment variables inos.environare automatically passed into the virtual environment.
import mlflow


class MyModel(mlflow.pyfunc.PythonModel):
    def predict(self, context, model_input, params=None):
        return model_input


with mlflow.start_run():
    model_info = mlflow.pyfunc.log_model(
        name="model",
        python_model=MyModel(),
        input_example=["a", "b", "c"],
    )

mlflow.models.predict(
    model_uri=model_info.model_uri,
    input_data=["a", "b", "c"],
    pip_requirements_override=["..."],
    extra_envs={"MY_ENV_VAR": "my_value"},
)
Environment managers
The mlflow.models.predict() API supports the following environment managers to create the virtual environment for prediction:
- virtualenv: The default environment manager.
- uv: An extremely fast environment manager written in Rust. This is an experimental feature since MLflow 2.20.0.
- conda: uses conda to create environment.
local: uses the current environment to run the model. Note thatpip_requirements_overrideis not supported in this mode.
Starting from MLflow 2.20.0, uv is available, and it is extremely fast.
Run pip install uv to install uv, or refer to uv installation guidance for other installation methods.
Example of using uv to create a virtual environment for prediction:
import mlflow

mlflow.models.predict(
    model_uri="models:/<model_id>",
    input_data="your_data",
    env_manager="uv",
)
Built-In Deployment Tools
This information has been moved to the MLflow Deployment page.
Export a python_function model as an Apache Spark UDF
If you are using a model that has a very long running inference latency (i.e., a
transformers model) that could take longer than the default timeout of 60 seconds,
you can utilize the extra_env argument when defining the spark_udf instance for your
MLflow model, specifying an override to the environment variable MLFLOW_SCORING_SERVER_REQUEST_TIMEOUT.
For further guidance, please see :py:func:mlflow.pyfunc.spark_udf.
You can output a python_function model as an Apache Spark UDF, which can be uploaded to a
Spark cluster and used to score the model.
from pyspark.sql.functions import struct
from pyspark.sql import SparkSession

spark = SparkSession.builder.getOrCreate()
pyfunc_udf = mlflow.pyfunc.spark_udf(spark, "<path-to-model>")
df = spark_df.withColumn("prediction", pyfunc_udf(struct([...])))
If a model contains a signature, the UDF can be called without specifying column name arguments. In this case, the UDF will be called with column names from signature, so the evaluation dataframe's column names must match the model signature's column names.
from pyspark.sql import SparkSession

spark = SparkSession.builder.getOrCreate()
pyfunc_udf = mlflow.pyfunc.spark_udf(spark, "<path-to-model-with-signature>")
df = spark_df.withColumn("prediction", pyfunc_udf())
If a model contains a signature with tensor spec inputs, you will need to pass a column of array type as a corresponding UDF argument. The values in this column must be comprised of one-dimensional arrays. The UDF will reshape the array values to the required shape with 'C' order (i.e. read / write the elements using C-like index order) and cast the values as the required tensor spec type. For example, assuming a model requires input 'a' of shape (-1, 2, 3) and input 'b' of shape (-1, 4, 5). In order to perform inference on this data, we need to prepare a Spark DataFrame with column 'a' containing arrays of length 6 and column 'b' containing arrays of length 20. We can then invoke the UDF like following example code:
from pyspark.sql import SparkSession

spark = SparkSession.builder.getOrCreate()
# Assuming the model requires input 'a' of shape (-1, 2, 3) and input 'b' of shape (-1, 4, 5)
model_path = "<path-to-model-requiring-multidimensional-inputs>"
pyfunc_udf = mlflow.pyfunc.spark_udf(spark, model_path)
# The `spark_df` has column 'a' containing arrays of length 6 and
# column 'b' containing arrays of length 20
df = spark_df.withColumn("prediction", pyfunc_udf(struct("a", "b")))
The resulting UDF is based on Spark's Pandas UDF and is currently limited to producing either a single
value, an array of values, or a struct containing multiple field values
of the same type per observation. By default, we return the first
numeric column as a double. You can control what result is returned by supplying result_type
argument. The following values are supported:
'int'or IntegerType: The leftmost integer that can fit inint32result is returned or an exception is raised if there are none.'long'or LongType: The leftmost long integer that can fit inint64result is returned or an exception is raised if there are none.- ArrayType (IntegerType | LongType): Return all integer columns that can fit into the requested size.
'float'or FloatType: The leftmost numeric result cast tofloat32is returned or an exception is raised if there are no numeric columns.'double'or DoubleType: The leftmost numeric result cast todoubleis returned or an exception is raised if there are no numeric columns.- ArrayType ( FloatType | DoubleType ): Return all numeric columns cast to the requested type. An exception is raised if there are no numeric columns.
'string'or StringType: Result is the leftmost column cast as string.- ArrayType ( StringType ): Return all columns cast as string.
'bool'or'boolean'or BooleanType: The leftmost column cast toboolis returned or an exception is raised if the values cannot be coerced.'field1 FIELD1_TYPE, field2 FIELD2_TYPE, ...': A struct type containing multiple fields separated by comma, each field type must be one of types listed above.
from pyspark.sql import SparkSession

spark = SparkSession.builder.getOrCreate()
# Suppose the PyFunc model `predict` method returns a dict like:
# `{'prediction': 1-dim_array, 'probability': 2-dim_array}`
# You can supply result_type to be a struct type containing
# 2 fields 'prediction' and 'probability' like following.
pyfunc_udf = mlflow.pyfunc.spark_udf(
    spark, "<path-to-model>", result_type="prediction float, probability: array<float>"
)
df = spark_df.withColumn("prediction", pyfunc_udf())
from pyspark.sql.types import ArrayType, FloatType
from pyspark.sql.functions import struct
from pyspark.sql import SparkSession

spark = SparkSession.builder.getOrCreate()
pyfunc_udf = mlflow.pyfunc.spark_udf(
    spark, "path/to/model", result_type=ArrayType(FloatType())
)
# The prediction column will contain all the numeric columns returned by the model as floats
df = spark_df.withColumn("prediction", pyfunc_udf(struct("name", "age")))
If you want to use conda to restore the python environment that was used to train the model,
set the env_manager argument when calling mlflow.pyfunc.spark_udf().
from pyspark.sql.types import ArrayType, FloatType
from pyspark.sql.functions import struct
from pyspark.sql import SparkSession

spark = SparkSession.builder.getOrCreate()
pyfunc_udf = mlflow.pyfunc.spark_udf(
    spark,
    "path/to/model",
    result_type=ArrayType(FloatType()),
    env_manager="conda",  # Use conda to restore the environment used in training
)
df = spark_df.withColumn("prediction", pyfunc_udf(struct("name", "age")))
If you want to call mlflow.pyfunc.spark_udf() through Databricks connect in remote client,
you need to build the model environment in Databricks runtime first.
from mlflow.pyfunc import build_model_env

# Build the model env and save it as an archive file to the provided UC volume directory
# and print the saved model env archive file path (like '/Volumes/.../.../XXXXX.tar.gz')
print(build_model_env(model_uri, "/Volumes/..."))

# print the cluster id. Databricks Connect client needs to use the cluster id.
print(spark.conf.get("spark.databricks.clusterUsageTags.clusterId"))
Once you have pre-built the model environment, you can run mlflow.pyfunc.spark_udf() with 'prebuilt_model_env'
parameter through Databricks connect in remote client,
from databricks.connect import DatabricksSession

spark = DatabricksSession.builder.remote(
    host=os.environ["DATABRICKS_HOST"],
    token=os.environ["DATABRICKS_TOKEN"],
    cluster_id="<cluster id>",  # get cluster id by spark.conf.get("spark.databricks.clusterUsageTags.clusterId")
).getOrCreate()

# The path generated by `build_model_env` in Databricks runtime.
model_env_uc_uri = "dbfs:/Volumes/.../.../XXXXX.tar.gz"
pyfunc_udf = mlflow.pyfunc.spark_udf(
    spark, model_uri, prebuilt_env_uri=model_env_uc_uri
)
Deployment to Custom Targets
In addition to the built-in deployment tools, MLflow provides a pluggable mlflow.deployments()
and mlflow deployments CLI for deploying models to custom targets and environments.
To deploy to a custom target, you must first install an appropriate third-party Python plugin. See the list of
known community-maintained plugins here.
Commands
The mlflow deployments CLI contains the following commands, which can also be invoked programmatically
using the mlflow.deployments Python API:
- Create: Deploy an MLflow model to a specified custom target
- Delete: Delete a deployment
- Update: Update an existing deployment, for example to deploy a new model version or change the deployment's configuration (e.g. increase replica count)
- List: List IDs of all deployments
- Get: Print a detailed description of a particular deployment
- Run Local: Deploy the model locally for testing
- Help: Show the help string for the specified target
For more info, see:
mlflow deployments --help
mlflow deployments create --help
mlflow deployments delete --help
mlflow deployments update --help
mlflow deployments list --help
mlflow deployments get --help
mlflow deployments run-local --help
mlflow deployments help --help
Community Model Flavors
Go to the Community Model Flavors page to get an overview of other useful MLflow flavors, which are developed and maintained by the MLflow community.