MLflow Tracking Quickstart
Welcome to MLflow!
The purpose of this quickstart is to provide a quick guide to the most essential core APIs of MLflow Tracking. Specifically, those that enable the logging, registering, and loading of a model for inference.
Note
For a more in-depth and tutorial-based approach (if that is your style), please see the Getting Started with MLflow tutorial. We recommend that you start here first, though, as this quickstart uses the most common and frequently-used APIs for MLflow Tracking and serves as a good foundation for the other tutorials in the documentation.
What you will learn
In just a few minutes of following along with this quickstart, you will learn:
How to log parameters, metrics, and a model
The basics of the MLflow fluent API
How to register a model during logging
How to navigate to a model in the MLflow UI
How to load a logged model for inference
If you would like to see this quickstart in a purely notebook format, we have a downloadable and viewable notebook-only version of this quickstart:
Step 1 - Get MLflow
MLflow is available on PyPI.
Installing Stable Release
If you don’t already have it installed on your system, you can install it with:
pip install mlflow
Installing a Release Candidate (RC)
If you are eager to test out new features and validate that an upcoming release of MLflow will work well in your infrastructure, installing the latest release candidate may be of interest to you.
Note
Release Candidate builds are not recommended for actual use, rather they are intended only for testing validation.
To install the latest version of MLflow’s release candidates for a given version, see the example below that uses MLflow 2.14.0 as an example:
# install the latest release candidate
pip install --pre mlflow

# or install a specific rc version
pip install mlflow==2.14.0rc0
Step 2 - Start a Tracking Server
Using a Managed MLflow Tracking Server
For details on options for using a managed MLflow Tracking Server, including how to create a free Databricks Community Edition account with managed MLflow, see the guide for tracking server options.
(Optional) Run a local Tracking Server
We’re going to start a local MLflow Tracking Server, which we will connect to for logging our data for this quickstart. From a terminal, run:
mlflow server --host 127.0.0.1 --port 8080
Note
You can choose any port that you would like, provided that it’s not already in use.
Set the Tracking Server URI (if not using a Databricks Managed MLflow Tracking Server)
If you’re using a managed MLflow Tracking Server that is not provided by Databricks, or if you’re running a local tracking server, ensure that you set the tracking server’s uri using:
import mlflow

mlflow.set_tracking_uri(uri="http://<host>:<port>")
If this is not set within your notebook or runtime environment, the runs will be logged to your local file system.
Step 3 - Train a model and prepare metadata for logging
In this section, we’re going to log a model with MLflow. A quick overview of the steps are:
Load and prepare the Iris dataset for modeling.
Train a Logistic Regression model and evaluate its performance.
Prepare the model hyperparameters and calculate metrics for logging.
import mlflow
from mlflow.models import infer_signature

import pandas as pd
from sklearn import datasets
from sklearn.model_selection import train_test_split
from sklearn.linear_model import LogisticRegression
from sklearn.metrics import accuracy_score, precision_score, recall_score, f1_score


# Load the Iris dataset
X, y = datasets.load_iris(return_X_y=True)

# Split the data into training and test sets
X_train, X_test, y_train, y_test = train_test_split(
    X, y, test_size=0.2, random_state=42
)

# Define the model hyperparameters
params = {
    "solver": "lbfgs",
    "max_iter": 1000,
    "multi_class": "auto",
    "random_state": 8888,
}

# Train the model
lr = LogisticRegression(**params)
lr.fit(X_train, y_train)

# Predict on the test set
y_pred = lr.predict(X_test)

# Calculate metrics
accuracy = accuracy_score(y_test, y_pred)
Step 4 - Log the model and its metadata to MLflow
In this next step, we’re going to use the model that we trained, the hyperparameters that we specified for the model’s fit, and the loss metrics that were calculated by evaluating the model’s performance on the test data to log to MLflow.
The steps that we will take are:
Initiate an MLflow run context to start a new run that we will log the model and metadata to.
Log model parameters and performance metrics.
Tag the run for easy retrieval.
Register the model in the MLflow Model Registry while logging (saving) the model.
Note
While it can be valid to wrap the entire code within the start_run block, this is not recommended. If there as in issue with the
training of the model or any other portion of code that is unrelated to MLflow-related actions, an empty or partially-logged run will be
created, which will necessitate manual cleanup of the invalid run. It is best to keep the training execution outside of the run context block
to ensure that the loggable content (parameters, metrics, artifacts, and the model) are fully materialized prior to logging.
# Set our tracking server uri for logging
mlflow.set_tracking_uri(uri="http://127.0.0.1:8080")

# Create a new MLflow Experiment
mlflow.set_experiment("MLflow Quickstart")

# Start an MLflow run
with mlflow.start_run():
    # Log the hyperparameters
    mlflow.log_params(params)

    # Log the loss metric
    mlflow.log_metric("accuracy", accuracy)

    # Set a tag that we can use to remind ourselves what this run was for
    mlflow.set_tag("Training Info", "Basic LR model for iris data")

    # Infer the model signature
    signature = infer_signature(X_train, lr.predict(X_train))

    # Log the model
    model_info = mlflow.sklearn.log_model(
        sk_model=lr,
        artifact_path="iris_model",
        signature=signature,
        input_example=X_train,
        registered_model_name="tracking-quickstart",
    )
Step 5 - Load the model as a Python Function (pyfunc) and use it for inference
After logging the model, we can perform inference by:
Loading the model using MLflow’s pyfunc flavor.
Running Predict on new data using the loaded model.
Note
The iris training data that we used was a numpy array structure. However, we can submit a Pandas DataFrame as well to the predict method, as shown below.
# Load the model back for predictions as a generic Python Function model
loaded_model = mlflow.pyfunc.load_model(model_info.model_uri)

predictions = loaded_model.predict(X_test)

iris_feature_names = datasets.load_iris().feature_names

result = pd.DataFrame(X_test, columns=iris_feature_names)
result["actual_class"] = y_test
result["predicted_class"] = predictions

result[:4]
The output of this code will look something like this:
sepal length (cm) |
sepal width (cm) |
petal length (cm) |
petal width (cm) |
actual_class |
predicted_class |
|---|---|---|---|---|---|
6.1 |
2.8 |
4.7 |
1.2 |
1 |
1 |
5.7 |
3.8 |
1.7 |
0.3 |
0 |
0 |
7.7 |
2.6 |
6.9 |
2.3 |
2 |
2 |
6.0 |
2.9 |
4.5 |
1.5 |
1 |
1 |
Step 6 - View the Run in the MLflow UI
In order to see the results of our run, we can navigate to the MLflow UI. Since we have already started the Tracking Server at http://localhost:8080, we can simply navigate to that URL in our browser.
When opening the site, you will see a screen similar to the following:
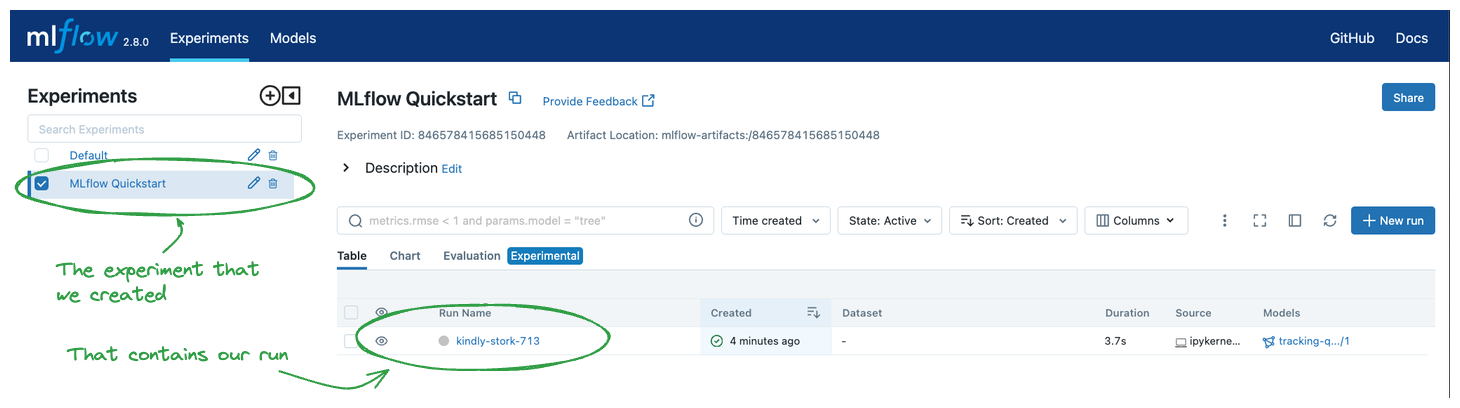
Clicking on the name of the Experiment that we created (“MLflow Quickstart”) will give us a list of runs associated with the Experiment. You should see a random name that has been generated for the run and nothing else show up in the Table list view to the right.
Clicking on the name of the run will take you to the Run page, where the details of what we’ve logged will be shown. The elements have been highlighted below to show how and where this data is recorded within the UI.

Conclusion
Congratulations on working through the MLflow Tracking Quickstart! You should now have a basic understanding of how to use the MLflow Tracking API to log models.
If you are interested in a more in-depth tutorial, please see the Getting Started with MLflow tutorial as a good next step in increasing your knowledge about MLflow!